Unix, Linux and Mac OS X Notes

Here’s some notable command syntax I use. You can also select the Notes category and you’ll get more specific topics such as Linux LVM and Mac OS X commands.

rsyslog options

Forward syslog events to external host via UDP:
– edit /etc/rsyslog.conf .. add a stanza like the example at the end of the file .. a single @ = UDP forward, @@ = TCP forward

$WorkDirectory /var/lib/rsyslog # where to place spool files
$ActionQueueFileName fwdRule1 # unique name prefix for spool files
$ActionQueueMaxDiskSpace 1g # 1gb space limit (use as much as possible)
$ActionQueueSaveOnShutdown on # save messages to disk on shutdown
$ActionQueueType LinkedList # run asynchronously
$ActionResumeRetryCount -1 # infinite retries if host is down
# remote host is: name/ip:port, e.g. 192.168.0.1:514, port optional
*.* @10.0.0.45:514

– restart the rsyslog daemon
systemctl restart rsyslog.service
or
service rsyslog restart

Mac OS X syslog to remote syslog server

Forward syslog events on Mac OS X 10.11 to external syslog server via UDP or TCP:
– edit /etc/syslog.conf .. add a line at the end of the file .. a single @ = UDP forward, @@ = TCP forward

*.* @10.0.0.45:514
# remote host is: name or ip:port, e.g. 10.0.0.45:514, port optional

– restart the OS X syslog daemon
sudo launchctl unload /System/Library/LaunchDaemons/com.apple.syslogd.plist
sudo launchctl load /System/Library/LaunchDaemons/com.apple.syslogd.plist

Write ISO image to USB on Mac

– plug in USB to Mac
– lookup disk number
sudo diskutil list
– unmount the USB
sudo diskutil unmountDisk /dev/disk2
– copy ISO image to USB
sudo dd if=CentOS.iso of=/dev/disk2

NIC MAC change

Changing MAC address of NIC
– RedHat stores this in: /etc/sysconfig
networking/devices/ifcfg-eth?
networking/profiles/default/ifcfg-eth?
hwconf
You need to edit the hwaddr in /etc/sysconfig/hwconf and HWADDR in the other locations (some are links).

ssh tunneling of syslog traffic

– Example SSH configuration for tunneling a syslog TCP stream from a remote server back to a local node:

Remote node has TCP client process (rsyslog) running, we want it to write to a local TCP port (15514/tcp), and have that local port forward to the local node we have initiated the ssh connection from to a syslog daemon listening on port 1514/tcp:

Remote node rsyslog.conf:
@@localhost:15514

Event flow is through ssh on the remote node, listening on 15514/tcp and forwarding to the local node via ssh tunnel launched on the local node:
$ ssh -R 15514:localhost:1514 remotehostusername@remote.hostname.domain

To complete the picture, we probably want some sort of process on the local node to detect when the ssh connection has been lost and (1) re-establish the ssh connection, (2) restart rsyslog on the remote host to re-establish the connection from the remote rsyslog daemon to the ssh listener on port 15514/tcp.

YUM Software Repository

– Manually add DVD location/repository by:

35.3.1.2. Using a Red Hat Enterprise Linux Installation DVD as a Software Repository

To use a Red Hat Enterprise Linux installation DVD as a software repository, either in the form of a physical disc, or in the form of an ISO image file.

1. Create a mount point for the repository:
mkdir -p /path/to/repo

Where /path/to/repo is a location for the repository, for example, /mnt/repo. Mount the DVD on the mount point that you just created. If you are using a physical disc, you need to know the device name of your DVD drive. You can find the names of any CD or DVD drives on your system with the command cat /proc/sys/dev/cdrom/info. The first CD or DVD drive on the system is typically named sr0. When you know the device name, mount the DVD:
mount -r -t iso9660 /dev/device_name /path/to/repo
For example: mount -r -t iso9660 /dev/sr0 /mnt/repo

If you are using an ISO image file of a disc, mount the image file like this:
mount -r -t iso9660 -o loop /path/to/image/file.iso /path/to/repo
For example: mount -r -o loop /home/root/Downloads/RHEL6-Server-i386-DVD.iso /mnt/repo

Note that you can only mount an image file if the storage device that holds the image file is itself mounted. For example, if the image file is stored on a hard drive that is not mounted automatically when the system boots, you must mount the hard drive before you mount an image file stored on that hard drive. Consider a hard drive named /dev/sdb that is not automatically mounted at boot time and which has an image file stored in a directory named Downloads on its first partition:

mkdir /mnt/temp
mount /dev/sdb1 /mnt/temp
mkdir /mnt/repo
mount -r -t iso9660 -o loop mount -r -o loop /mnt/temp/Downloads/RHEL6-Server-i386-DVD.iso /mnt/repo

2. Create a new repo file in the /etc/yum.repos.d/ directory:
The name of the file is not important, as long as it ends in .repo. For example, dvd.repo is an obvious choice. Choose a name for the repo file and open it as a new file with the vi text editor. For example:

vi /etc/yum.repos.d/dvd.repo

[dvd]
baseurl=file:///mnt/repo/Server
enabled=1
gpgcheck=1
gpgkey=file:///etc/pki/rpm-gpg/RPM-GPG-KEY-redhat-release

The name of the repository is specified in square brackets — in this example, [dvd]. The name is not important, but you should choose something that is meaningful and recognizable. The line that specifies the baseurl should contain the path to the mount point that you created previously, suffixed with /Server for a Red Hat Enterprise Linux server installation DVD, or with /Client for a Red Hat Enterprise Linux client installation DVD. NOTE: After installing or upgrading software from the DVD, delete the repo file that you created to get updates from the online sources.

IP Networking

– Manually add IPv4 alias to interface by:
ip addr add 192.168.0.30/24 dev eth4
– Manually remove that IPv4 alias to interface by (note the subnet mask):
ip addr del 192.168.0.30/32 dev eth4
– Manually add route for specific host:
route add -host 45.56.119.201 gw 10.20.1.5

pcap files

– Split large pcap file by using command line tool that comes with Wireshark editcap:
editcap -c 10000 infile.pcap outfile.pcap

tcpdump options

Display only packets with SYN flag set (for host 10.10.1.1 and NOT port 80):
tcpdump 'host 10.10.1.1  &&  tcp[13]&0x02 = 2  &&  !port 80'

Mac OS X (10.7)

sudo /usr/sbin/sysctl -w net.inet.ip.fw.enable=1
sudo /sbin/ipfw -q /etc/firewall.conf
sudo ifconfig en0 lladdr 00:1e:c2:0f:86:10
sudo ifconfig en1 alias 192.168.0.10 netmask 255.255.255.0
sudo ifconfig en1 -alias 192.168.0.10
sudo route add -net 10.2.1.0/24 10.3.1.1

rpm commands:

List files in an rpm file
rpm -qlp package-name.rpm

List files associated with an already installed package
rpm --query –-filesbypkg package-name
How do I find out what rpm provides a file?
yum whatprovides '*bin/grep'
Returns the package that supplies the file, but the repoquery tool (in the yum-utils package) is faster and provides more output as well as do other queries such as listing package contents, dependencies, reverse-dependencies.

sed commands:

Remove specific patterns (delete or remove blank lines):
sed '/^$/d'
sed command matching multiple line pattern (a single log line got split into two lines, the second line beginning with a space):
cat syslog3.txt | sed 'N;s/\n / /' > syslog3a.txt
– matches the end of line (\n) and space at the beginning of the next line, then removes the newline

awk commands:

Print out key value pairs KVP separated by =:
awk /SRC=/ RS=" "
Print out source IP for all iptables entries that contain the keyword recent:
cat /var/log/iptables.log | egrep recent | awk /SRC=/ RS=" " | sort | uniq
Sum column one in a file, giving the average (where NR is the automatically computed number of lines in the file):
./packet_parser analyzer_data.pcap | awk '{print $5}' | sed -e 's/length=//g' | awk 'BEGIN {sum=0} { sum+=$1 } END { print sum/NR }'
Find the number of tabs per line – used to do a sanity check on tab delimited input files
awk -F$'\t' '{print NF-1;}' file | sort -u

sort by some mid-line column

I wanted to sort by the sub-facility message name internal to the dovecot messages, so found the default behavior of sorting by space delimited columns works.

sort -k6 refers to the sixth column with the default delimiter as space.
sort -tx -k1.20,1.25 is an alternative, where ‘x’ is a delimiter character that does not appear anywhere in the line, and character position 20 is the start of the sort key and character position 25 is the end of the sort key.

This sorts by the bold column:
$ sort -k6 dovecot.txt
Oct 7 09:09:31 server1 dovecot: auth: mysql: Connected to 10.30.132.15 (db1)
Oct 7 09:34:03 server1 dovecot: auth: sql(user1@example.com,10.30.132.15): Password mismatch
Oct 7 09:33:36 server1 dovecot: auth: sql(someuser@example.com,10.30.132.15): unknown user
Oct 7 09:15:27 server1 dovecot: imap(user1@example.com): Disconnected for inactivity bytes=946/215256
Oct 7 09:21:11 server1 dovecot: imap(user2@example2.com): Disconnected: Logged out bytes=120/12718

dos2unix equivalent with tr

tr -d '\15\32' < windows-file.csv > unix-file.csv

Fedora 16 biosdevname

– Fedora 16 includes a package called “biosdevname” that sets up strange network port names (p3p1 versus eth0) .. since I don’t particilarly care if my ethernet adapter(s) is(are) in a particular PCI slot, remove this nonsense by:

yum erase biosdevname

– to take total control of network interfaces back over (edit /etc/sysconfig/network-scripts/ifcfg-eth?)

– remove NetworkManager

yum erase NetworkManager
chkconfig network on

WordPress notes for pomeroy.us

Production site is www.pomeroy.us
Development site is dev.pomeroy.us

Assumptions:
– webserver root directory is /var/web
– production node is called prod
– development node is called dev
– WordPress database is called wpdb

Procedure to copy production WordPress instance to the development node:
1. Copy webserver www root dir via a tarball
tar czf prod-20110808.tgz /var/web

2. Dump the WordPress database to a MySQL dmp file:
mysqldump -u$mysqluser -p$mysqlpass wpdb | \
 gzip -c > prod-20110808.dmp.gz

3. Copy these two backup files to the dev node:
scp prod-20110808* user@dev:.

On the development node:
4. Unpack the webserver tarball:
mv /var/web /var/web.previous
cd /
tar xzvf prod-20110808.tgz

5. Drop the WordPress database and restore the new version:
mysql> drop database wpdb;
mysql> create database wpdp;
$ gunzip prod-20110808.dmp.gz
$ mysql -u$mysqluser -p wpdb < prod-20110808.dmp

6. Update the WordPress 'siteurl' and 'home' options to point to the development node:
update wp_options set option_value='http://dev.pomeroy.us' where option_name='siteurl';
update wp_options set option_value='http://dev.pomeroy.us' where option_name='home';

Should be all done!

Building a new PVR

<Updated Aug 18, 2011 after a successful PVR rollout>

Technology has evolved since the last MythTV PVR I built, as chronicled here.  Here’s the latest techniques and tech that I’ve used to (start) build(ing) my current PVR. I’ll update this article as I go, as there’s been some bumps along the way, so completion of the project has been slower than I anticipated.

Requirements for my new PVR include:

  • Linux operating system for cost and flexibility reasons
  • Quiet! Fan-less operation if at all possible, external power supply ok
  • Small form factor, black case to fit in with my current home theater gear
  • Video capture with MPEG-2 hardware acceleration to help keep the CPU needed as small as possible, in an expansion card format for the most compact physical footprint .. additionally there must be at least two independent tuners
  • Analog tuners, but would be good if they were capable of digital for when I eventually move to digital/HD
  • IR receiver and transmitter capability for easy remote control and ability of the PVR to use my current set-top box as a source (gives me all the cable company movies and channels that are not available via the basic cable connection
  • Ability to schedule at least 10 shows and retain 5 episodes of each show .. also ability to schedule based on show name alone
  • Ability to perform post-recording processing, such as removing commercials or changing formats
  • Should be able to use a pre-packaged distribution for most if not all of the functions .. I know it’s a home-brew, but I’m tired of messing with individual packages, firmware, and custom codes to make it work. Using a distribution package makes it easier to maintain through updates.
  • Want to purchase the parts from the same supplier if possible (ended up using newegg.ca)

Since I already run MythTV, it was an obvious starting point and given I don’t have an affinity to a specific Linux distribution, I looked at Mythbuntu and Mythdora since I’m familiar with and already run both Ubuntu and Fedora distributions.

After downloading the Mythbuntu 10.10 ISO disk image, I discovered I didn’t have my USB DVD drive, so I wanted to create a bootable USB flash disk.  I followed the excellent instructions at https://help.ubuntu.com/community/Installation/FromUSBStick and successfully burned a bootable Mythbuntu disk on a 2GB USB flash disk via a Ubuntu VM running on my MacBook Pro.


Continue reading

MySQL Notes

MySQL Command Line and Configuration Notes

Drop tables with wildcard:

There are multiple ways to specify MySQL credentials, this is not the best, but simply an example of how to drop tables using a wildcard pattern. In this case, command line history such as .bash_history will store your MySQL username and password plaintext, and an extended process listing will also reveal both username and password. When run from the command line like this, the SQL commands and the credentials are not stored in the MySQL history file (.mysql_history).  On closed (private) systems, the risk is low, especially if you clean up after these maintenance activities by purging the command histories.

mysql -u user -p password database -e "show tables" | grep "table_pattern_to_drop_" | awk '{print "drop table " $1 ";"}' | mysql -u user -p password database

Update WordPress home URL

There are times when moving or copying WordPress blogs from one server to another, the owner may want to update the URL associated with the specific site.

A simple MySQL update can match the WordPress blog to a new site URL:

mysql> select option_value from wp_options where option_name = 'siteurl';

+--------------------------------+
| option_value                   |
+--------------------------------+
| http://www.example.com |
+--------------------------------+
1 row in set (0.00 sec)

mysql> select option_value from wp_options where option_name = 'home';

+--------------------------------+
| option_value                   |
+--------------------------------+
| http://www.example.com |
+--------------------------------+
1 row in set (0.00 sec)

mysql> update wp_options set option_value='http://server.newsite.com' where option_name='siteurl';

Query OK, 1 row affected (0.00 sec)
Rows matched: 1  Changed: 1  Warnings: 0

mysql> update wp_options set option_value='http://server.newsite.com' where option_name='home';

Query OK, 1 row affected (0.00 sec)
Rows matched: 1  Changed: 1  Warnings: 0
 

w3af web security assessment tool gets support from Rapid7

Rapid7, which purchased the Metasploit attack framework last year, has agreed to sponsor the open source w3af web assessment and exploit project. This is fantastic news for web application development teams, since it shows the open source (and hence more affordable) tools they can use to improve the security of their applications are maturing.

Websites like sectools.org maintain lists of various security tools and point to numerous open source web application fuzzing and testing tools, including BurpSuite, Nikto, WebScarab, Whisker and Wikto. Although each of the open source tools I use have various strengths, w3af is IMHO the first reasonable challenger to commercial web application testing tools like IBM’s AppScan.

Can we please get rid of bad input validation errors now??

For a commercial IT security professional that wants to help an internal web application development team improve the security of their applications, tools like IBM’s AppScan and Acunetix WVS can save valuable time by generating reports that include not only the vulnerable URI but also include vulnerability background information (CVSS, OWASP, WASC), the specific HTTP request/response strings and suggested code fixes. This is particularly valuable to a security architect or operations role that is pressed for time (an army of one anyone?).

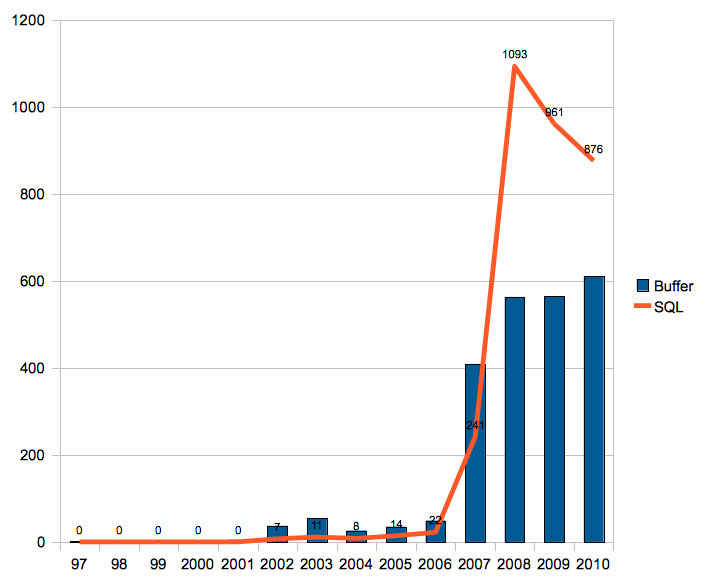
The w3af support from Rapid7 will enable this excellent tool to mature more quickly and improves the capability for any web development team, regardless of funding, to improve their security. Can we please get rid of bad input validation errors now?? My recent thesis illustrated the downright depressing numbers of SQL injection flaws that continue to exist. With tools like w3af, there is no excuse left for web developers to press applications into production with these injection flaws that are trivial to avoid. At the very least a survey of the NIST National Vulnerability Database does show the number of SQL injection flaws starting to drop. Unfortunately they still substantially outnumber traditional memory corruption flaws such as buffer overflows.

Explosion of SQL buffer errors

Explosion of SQL buffer errors

As you can see, the story up to 2008 was pretty grim for web applications – SQL injection flaws increased by over 1,500% in the same time buffer overflow errors increased by just over 500%.

Although it looks like there has been a reversal of the shocking explosion of SQL injection flaws, the sheer volume of these web application flaws is astonishing .. especially since injection flaws have been around for about 10 years. Not exactly a problem that has recently snuck up on us.

Web developers that still turn out applications that contain SQL or command injection errors and most cross site request forgery errors are simply guilty of gross negligence.

Despite the web development industry knowing these errors exist and good developers designing and coding to avoid these issues, there is still a need to build sufficient forensics around externally facing (publicly accessible) applications to enable reconstruction of attacks. In my next post, I outline a summary of my thesis “Effective SQL injection attack reconstruction using network recording”.

Resetting WordPress user passwords

Resetting WordPress 3.0 user passwords can be done directly within MySQL through the following procedure.  This assumes your installation of WordPress stores user passwords in the wp_users table as MD5 hashes and the unique site prefix for all WordPress tables in MySQL is _x.

Connect to the database via your favorite GUI (phpMyAdmin, Navicat) or command line with either the WordPress role account or any other MySQL user account with select and update privileges on the WordPress database:

update wp_x_users set user_pass = MD5('123abc890') where user_login = 'administrator';

This will update the password for user ‘administrator’ to ‘123abc890’.  Once this has completed, either flush the wp_x_users table or exit the tool used to access the database to cause the updates to be committed.  Sign into WordPress with the new password and optionally change the password via the user interface.

IMAP mailstore migration .. again

So last weekend, I discovered that Spamhaus decided it would be a good idea to place all of the public IP addresses for Slicehost (my Linux VPS hoster) into their Spamhaus block list (SBL). This covered both my slice in Dallas and the one in St. Louis – meaning an impressive chunk of inbound mail to my domains was being trashed by the sending MTA and an even bigger chunk of my outbound mail was being outright rejected since the sending IP’s were on the SBL.  Slicehost worked hard to convince Spamhaus to recind the blocklist, so the Slicehost IP’s got moved over to the less-nasty-but-you’re-still-probably-a-spamming-dirtbag Policy Block list (PBL) assuming affected IP owners would request to be removed from that list.

Sample query to see if you’re on any Spamhaus block list:  http://www.spamhaus.org/query/bl?ip=10.11.12.13

It seems it’s time to relinquish the care and feeding of my own Postfix mail system and turn to a hosted solution.  This means I need to migrate about 5GB of IMAP store to another site (again).  Last time I did a wholesale migration, I used imapsync to make the transition painless. In the code example below, an SSL connection to the IMAPS server at imap-server.sourcedomain.com is made with username@sourcedomain.com and the password stored in the plaintext file secret1. An SSL connection is made to the target system (which happens to be the server on which the imapsync tool is running, but could just as easily be another IMAPS server somewhere on a network accessible to the host where imapsync is running). The –delete and –expunge1 arguments will clean the successfully moved messages from IMAP store #1 .. so be sure you have your messages on the target successfully! Imapsync can be run iteratively to ensure you have got all the messages from your source.


/usr/bin/imapsync \
--host1 imap-server.sourcedomain.com \
--ssl1 \
--authmech1 LOGIN \
--user1 username@sourcedomain.com --passfile1 secret1 \
--host2 127.0.0.1 --user2 username@targetdomain.com --passfile2 secret2 \
--ssl2 \
--delete --expunge1 \
--buffersize=128

And one can use the

--dry

option to just test the process but not actually move any of the messages.

So that’s it – I’m about half way though migrating my current IMAP stores over to a hosted mail solution, so that I don’t need to keep up with the increasing level of care and feeding that running your own mail service requires.  Before I get too many darts about that .. I first started running my own personal MTA in 1995, adding spam and av filtering over time, and adding substantial redundancy (servers, sites, storage) so I could rely on it and fix things that broke as I had time rather than right when they broke (which was always at a bad time).  My new hosted solution takes over from two VPS servers running Postfix, Spamassassin, ClamAV, Greylisting with the IMAP store replicated across data centers in different states (15 minute rsyncs).  So soon, the (hopefully) last Allen Pomeroy owned and operated MTA can be turned off, while I get to work on fun stuff, rather than figuring out why my email is bouncing.  🙂

Update 2012/12/17:

Sometimes manual manipulation of your mailstore via IMAP is needed, so here’s how I deleted a large number of folders I had trashed and were being synced to my new system from the old.  Kinda clunky, since I didn’t get the scripted version to work (just used a copy/paste in an interactive bash session), but got the job done for now.

Connect to the IMAP server using SSL:
openssl s_client -crlf -connect imap.emailsrvr.com:993

* OK [CAPABILITY IMAP4rev1 LITERAL+ SASL-IR LOGIN-REFERRALS ID ENABLE IDLE AUTH=PLAIN] Server ready director6.mail.ord1a.rsapps.net

Log in with your email credentials:
0 login user@domain.com Password

0 OK [CAPABILITY IMAP4rev1 LITERAL+ SASL-IR LOGIN-REFERRALS ID ENABLE IDLE SORT SORT=DISPLAY THREAD=REFERENCES THREAD=REFS MULTIAPPEND UNSELECT CHILDREN NAMESPACE UIDPLUS LIST-EXTENDED I18NLEVEL=1 CONDSTORE QRESYNC ESEARCH ESORT SEARCHRES WITHIN CONTEXT=SEARCH LIST-STATUS QUOTA] Logged in

List the folders you want to remove:
0 list "" "Trash.*"

That didn’t return the list I was expecting, so I listed all folders
0 list "" "*"

… and realized the source mail system adds “INBOX” on the front of the folder names, so then this command worked to list the folders to be deleted:
0 list "" "INBOX.Trash.*"

I copied the output and edited it to insert the folder name into a delete command:
0 delete "INBOX.Trash.Folder1"
0 delete "INBOX.Trash.Folder2"
0 delete "INBOX.Trash.Folder3"

0 OK Delete completed.

Finish off the session by logging out:
0 logout

* BYE Logging out
0 OK Logout completed.
closed

Building a web security lab (with VMware Fusion)

Problem: VMware machines load boot loader immediately, no BIOS banner, so can’t get into BIOS to alter boot settings.
Solution: Edit the vm’s .vmx file and add the line:

bios.bootDelay = "5000"

which adds a 5000 millisecond (5 second) delay to the boot, or add:

bios.forceSetupOnce = "TRUE"

to make the VM enter the BIOS setup at the next boot.

Problem: VMware Fusion 3.0 doesn’t give a way to edit the virtual network settings via the GUI.
Solution: To change the subnet used by the NAT or HostOnly networks, go root in Mac OS X and edit

/Library/Application Support/VMware Fusion/networking

and set the following lines to the subnets desired:

answer VNET_1_HOSTONLY_SUBNET 192.168.35.0
answer VNET_8_HOSTONLY_SUBNET 10.10.1.0

To add additional custom isolated host only VLANs, also edit the networking file and add additional VNET definitions. There can apparently only be 8 VLANs with VLAN 1 and 8 already pre-defined.

answer VNET_2_DHCP no
answer VNET_2_HOSTONLY_NETMASK 255.255.255.0
answer VNET_2_HOSTONLY_SUBNET 10.10.21.0
answer VNET_2_VIRTUAL_ADAPTER yes
answer VNET_3_DHCP no
answer VNET_3_HOSTONLY_NETMASK 255.255.255.0
answer VNET_3_HOSTONLY_SUBNET 10.10.22.0
answer VNET_3_VIRTUAL_ADAPTER yes
answer VNET_4_DHCP no
answer VNET_4_HOSTONLY_NETMASK 255.255.255.0
answer VNET_4_HOSTONLY_SUBNET 10.10.23.0
answer VNET_4_VIRTUAL_ADAPTER yes

Now create your vm with as many network interfaces as you have separate VLANs (vnet) then edit the node.vmx vm configuration file and change the interfacename.connectionType to custom, and define the VLAN (vnet) that interface will attach to:

#ethernet0.connectionType = "nat"
ethernet0.connectionType = "custom"
ethernet0.vnet = "vmnet3"

Also realize that VMware will take the .1 host address on each vmnet – so you cannot assign .1 to any of your VMs.

Problem: Ubuntu 9.10 persistent network configuration (stores the MAC address of network adapters), so if you copy a machine, by default Ubuntu will setup a new logical adapter (eth1) since the MAC address has changed (when you answer I Copied It in VMware).
Solution: Tell VMware you copied the machine, so it will chose a unique MAC address. Boot Ubuntu into single user mode (another article on that to follow) then edit the MAC address associated with eth0.

sudo vi /etc/udev/rules.d/70-persistent-net.rules

find the stanza of the network interface in question (NAME=”eth0″) and set the following ATTR tag to the new MAC address:

ATTR{address}=="new-mac-address-here"