I used to work with Digital Equipment Corporation (DEC) VAX systems and for fun built up a VMS 7.1 system using the amazing processor simulator SIMH to get a VAX8600 running. One of the challenges was lack of TCP/IP networking stack to push software backup savesets to the system. One process involves creating an ISO of local files then mounting that image inside SIMH and mounting it in VMS. Painful since it modifies the files and filenames.
This is a from-scratch implementation of DEC Files-11 (ODS-2) utility to copy local files from a Linux (likely a Mac too) system to an ODS-2 disk volume that is usable by SIMH simulator running a VAX/VMS (vax8600) OpenVMS 7.1 system.
The ods2v2 utility can run a minimal set of VMS DCL type commands on the disk file, with the intent of transferring files into or out of the VMS system. Reads and writes real ODS-2 disk images – the same format real VMS’s own MOUNT, INITIALIZE, COPY, and DIRECTORY commands use. No VMS installation, SIMH emulator, or license required to use it.
Built directly from the Files-11 On-Disk Structure Specification, not from copying an existing implementation, and validated repeatedly against real OpenVMS 7.1 (via SIMH) throughout development with real MOUNT / DIR / TYPE / COPY and ANALYZE/DISK commands on a vax8600 running OpenVMS 7.1 in simh. Every significant bug this project found (a word-swapped 32-bit field, an inverted bitmap convention, directory records needing to be storage-sorted) was found with analysis on an OpenVMS system.
In my previous post How to Build a ProxMox Hypervisor Cluster with NAS Disk I described the configuration of QNAP NAS iSCSI LUNs to support ProxMox hypervisor servers with the goal of highly available high performance disk. In this post I will outline the configuration of VMs within the ProxMox cluster to gain disk replication across specific hypervisor hosts. Replication is a pretty slick and painless way to provide (higher) availability of VMs both for maintenance activities as well as host node failures without the complexity of full HA Cluster configuration. I do have pretty substantial experience with Linux Virtual Sever (LVS) and commercial clustering solutions, so I will likely address the ProxMox version of that capability in a future article.
To recap from my previous article, each of the three (3) ProxMox hosts has a pair of mirrored HDD, which are only used for ProxMox OS. Each host also has a single SSD for the occasional IOPs hungry VM. Although single local disk does present a failure risk, at this point in my network design, that is a deliberate choice. Any VM that cannot tolerate that single point of failure is required to use the iSCSI zpool. Also the goal at this point is not to go overboard on elimination of every single point of failure, just the highest probabilities. At this point there are three (3) different hosts, three (3) separate UPS, all using multiple network adapters for performance management. QNAP NAS iSCSI volumes are used for disk redundancy.
Design
Adding replication to any of my ProxMox VMs is made straight forward by a couple of design choices. Every ProxMox host has the same ZFS zpool storage groups which are all named the same across each host – currently two: zfs-ssd1 (local SSD on each host) and zfs-iscsi1 (QNAP NAS served iSCSI LUNs dedicated to each host). Technically VMs could use the local ZFS rpool, however I’ve chosen to keep VM disks completely separate from local ProxMox OS storage.
Generally the entire process involves three simple steps: Create VM, Configure Replication, Request Migration.
Setup our VMs
We can create the guest VMs as usual, but must specify virtual disk volumes within the zfs-ssd1, zfs-iscsi1, or both ZFS storage pools.
Use host > zfs-ssd1 > Summary and host > zfs-iscsi1 > Summary pages in the UI to determine capacity left on each host. As you would expect, allocation of space for a VM needs to take place on all hosts on which that VM is desired to be replicated. Replicating a VM to all hosts will take 3x the storage allocation versus having no replication.
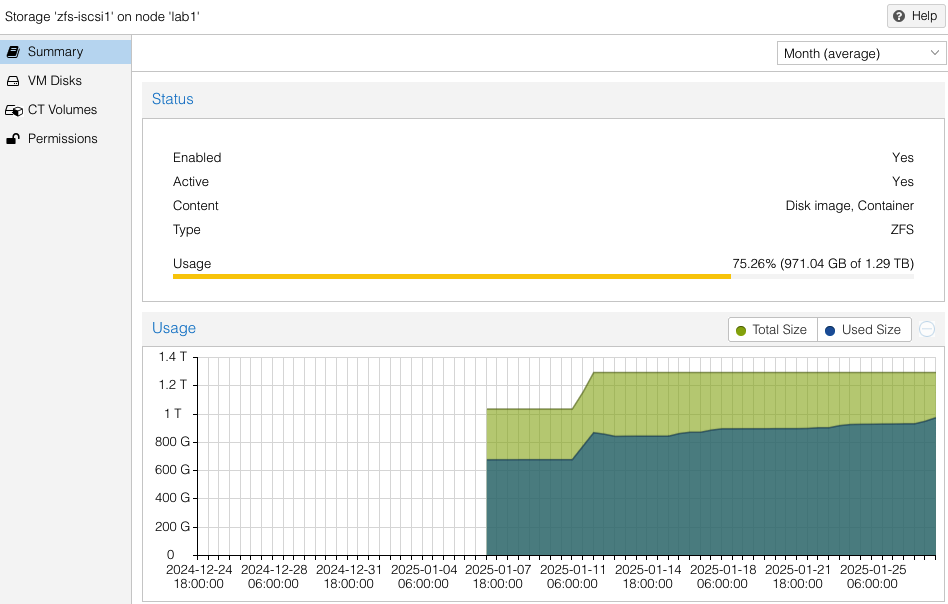
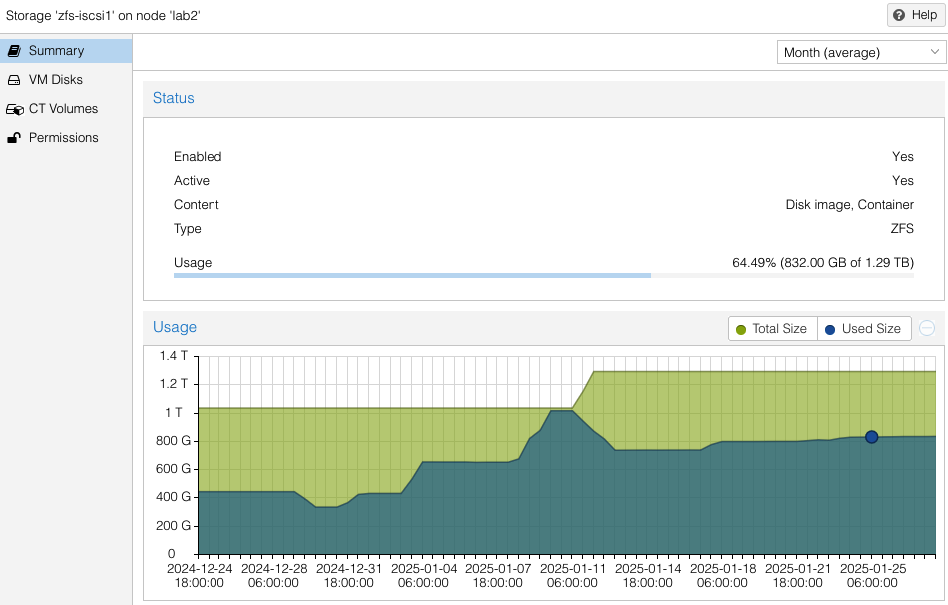
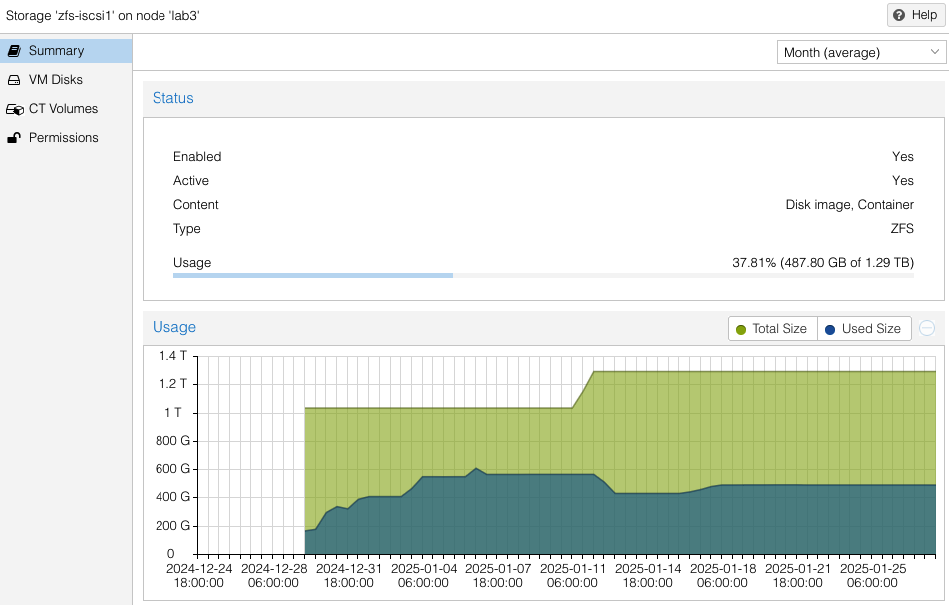
Note the availability and allocation of iSCSI storage on each of the three (3) ProxMox hosts. Might seem like lab2 was setup first, then lab3, then lab1. Actually both lab3 and lab1 were rebuilt after the initial three (3) node cluster was built. No loss of VMs occurred since I had all VMs replicated to the surviving cluster nodes while I did a rolling rebuild – there was always at least two cluster hosts. Also you can see at the beginning of January (01-11) zfs-iscsi1 pool was running out of space to allocate to either VMs or replication. I simply added another 250GB iSCSI LUN from the QNAP and extended the zfs-iscsi1 pool. More on that later.
VM Example – Replication to One Host
Our first VM will have multiple virtual disks located in the zfs-iscsi1 pool. These are all in the zfs-iscsi1 pool, however it could just as easy have a mix of zfs-iscsi1 and zfs-ssd1 virtual disks – presuming there is sufficient space available in the target host pools to which we intend to replicate. There is no restriction of number of pools used by the VM, just as long as those pool names are available on the target host.
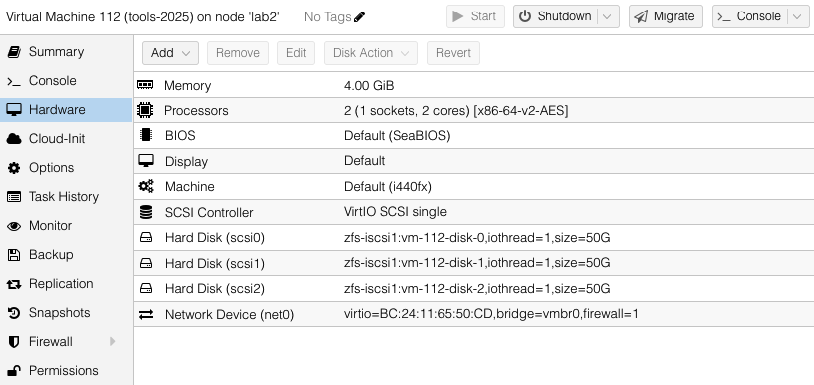
We will configure the tools-2025 VM to replicate to one other host – lab1.
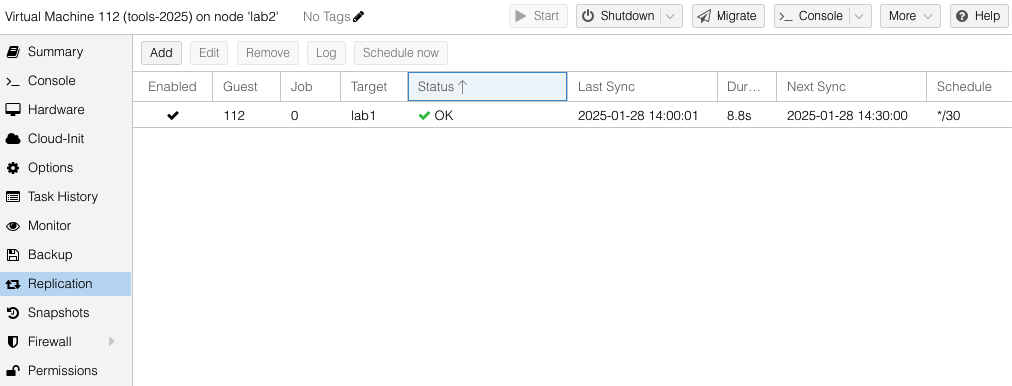
While creating the replication job, dialog boxes are used to select destination host(s) and the frequency of the replication. Sync jobs are run by taking zpool snapshots and sending those snapshots to the target host. Typical cadence would be every 15 minutes for sync of important VMs. Offline or less important VMs can sync hourly, nightly or even monthly – similar options as what you would find with Linux crontab jobs. Shortly after you have created the replication job, ProxMox will get it running in the background.
Difference Between Replicate and Migrate
Replication jobs run on a regular basis to push ZFS snapshots to the target hosts. When a migration of VM from one host to another is requested – literally a button push – the replication will speed the migration through the use of snapshots that are already on the target host. It is not necessary to have replication jobs enabled in order to migrate a VM, however it will take longer to migrate the more disk data that has to be synchronized. When migrating VMs with a large amount of storage that has not been replicated, it can take a very long time to run and possibly not successfully complete in the case of attempting live migrations. More on this in the next example.
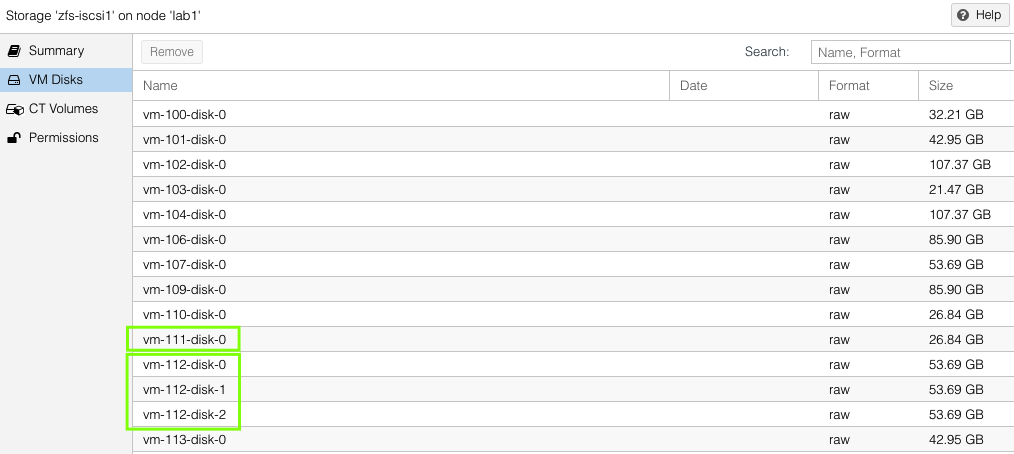
On each host, one can see the VM virtual disks that have been replicated by looking at host > ZFS pool name > VM Disks. This list will be the same on both the source and the target hosts.
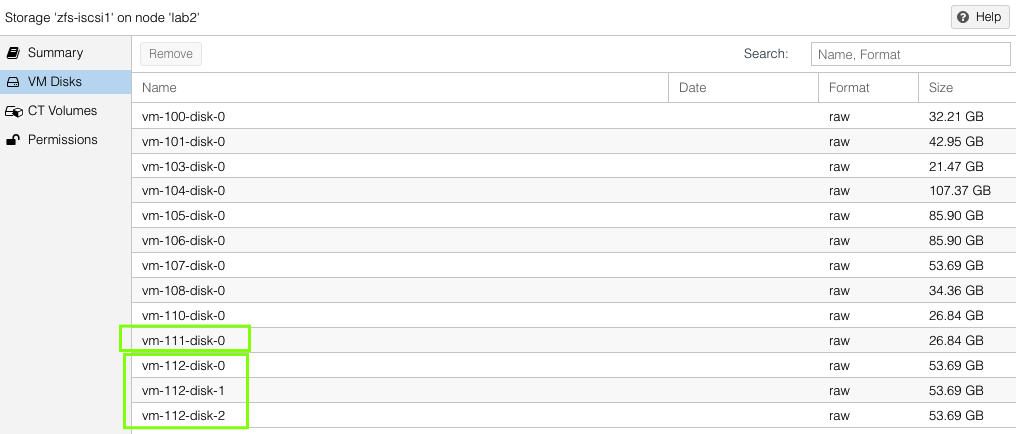
VM Example – Replication to Two Hosts
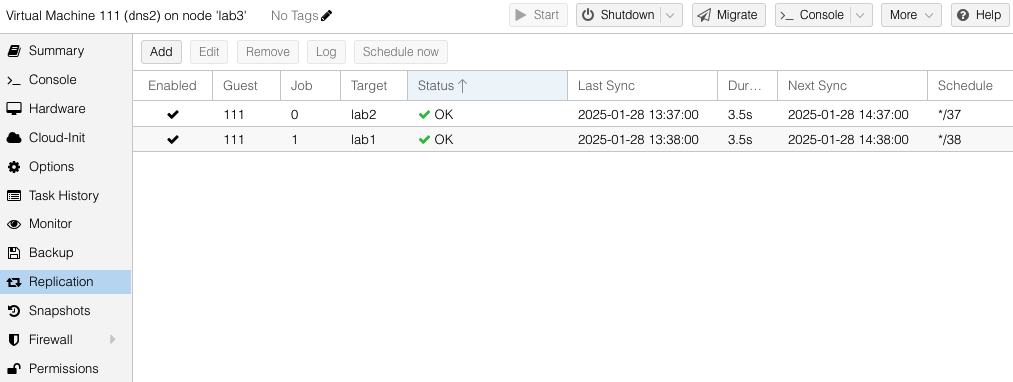
Our second VM will have a single virtual disks located in the zfs-iscsi1 pool but is going to replicate to both of the other standby ProxMox hosts.
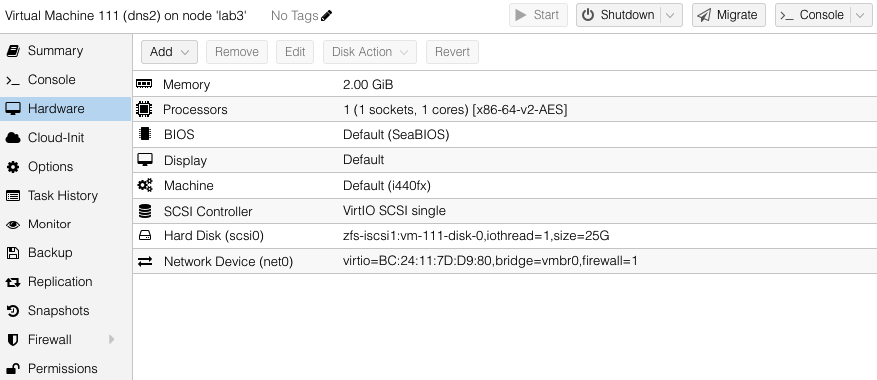
You can see both the replication jobs configured for VM 111, one to lab1 and the other to lab2. The replication job frequency is completely flexible however I have chosen to offset the schedules to reduce the disk use bandwidth.
Migration to Target Host
Migrations can be either offline (VM powered off) or live. To request a migration, we just select the Migrate button under the VM to be moved. Live migrations are just that – it replicates then moves a running VM to a target host with no perceived downtime.
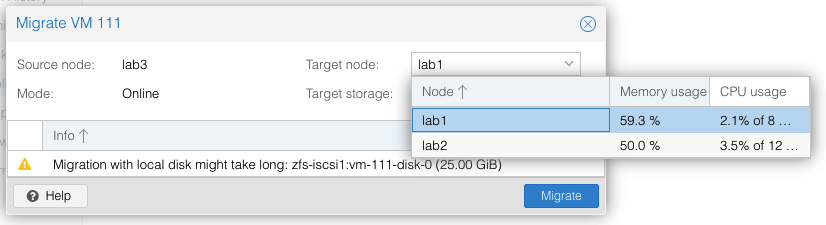
The migrate menu will show you the current CPU and memory load of the available target systems. Fastest migrations are offline VMs that have had a recent replication job complete. Large VMs with lots of disk and memory and no prior replication have been known to fail to migrate – it is complicated to snapshot live memory for synchronization to a target host. All but the largest of VMs I have (looking at you elasticsearch) have no problems in migrating live in less than maybe 30 seconds for 4GB of memory.
In the case there is sufficient CPU and memory capacity on the target host, one can request a Bulk Migration operation from the main menu of the source host. I have used this several times to perform maintenance on cluster hosts where downtime is needed. The live migration of VMs is amazing .. makes life so much easier, with no VM reboot or downtime.
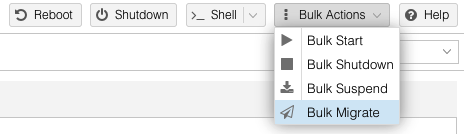
Failure Recovery
The scenarios I have outlined so far are most common, however one of the key use cases I wanted to be able to cover is what happens when a ProxMox host unexpected fails.
Fortunately a surviving host can start the failed VMs from last transferred snapshot. Clearly any data that was changed after the last replication snapshot will be lost. Not great for any VMs that are hosting applications / functions that are frequently changing, such as database servers. This ability is still sufficient for my use case and situation – low chance of host failure causing total data corruption (still not zero but far better than what I had before). A future article will focus on use of HA Cluster features including global cluster filesystems to cover those systems I have that have high(er) integrity requirements.
For example purposes, assume a three (3) node ProxMox hypervisor cluster without HA as I’ve described above. Two ZFS disk pools, zfs-ssd1 and zfs-iscsi1. We’ll reference six (6) guest VMs that have been created and configured to be using disk volumes within the zfs-iscsi1 pool. Currently two (2) VM are on each ProxMox host. Replication jobs have been configured on all VM to replicate every 15 minutes to both other ProxMox hosts. VMs on lab1 are vm-1 and vm-2. VMs on lab2 are vm-3 and vm-4. VMs on lab3 are vm-111 and vm-112. In this case assume lab3 has suddenly failed and is completely offline/powered off. The following process will allow a restart of vm-111 and vm-112 on either lab1 or lab2. For simplicity let’s restart vm-111 on lab1 and vm-112 on lab2.
Verify Replication
We need to confirm that the replication data for vm-111 and vm-112 exists on lab1 and lab2:
lab1:
zfs list | grep "vm-111"
zfs-iscsi1/vm-111-disk-0 28.2G 323G 2.81G -
Since we see datasets zfs-iscsi1/vm-111-disk-0 and zfs-iscsi1/vm-112-disk-0, the replication data appears to be intact.
Import the VM Configuration
Each VM has a configuration file in /etc/pve/qemu-server/ on the Proxmox cluster.
Check if the config files for vm-111 are on lab1 and vm-112 are present on lab2:
lab1# ls /etc/pve/qemu-server
100.conf 101.conf 102.conf 103.conf 111.conf 113.conf
lab2# ls /etc/pve/qemu-server
100.conf 112.conf 118.conf
Since the config files exist, we can proceed to the next step. If those files do not exist, move the configuration files manually from the lab3 replicated configuration. ProxMox uses cluster filesystem for /etc/pve directory so those files should be in the /etc/pve/qemu-server/lab3 directory.
lab1# cd /etc/pve
lab1# mv nodes/lab3/qemu-server/111.conf qemu-server/
Next we need to verify manual adjustment of VM configuration not needed. Ensure the disk paths in the configuration files match the replicated ZFS datasets on the new host. Since our design uses the same ZFS zpool names on all ProxMox hosts, should not need to change the paths which will look like:
scsi0: zfs-iscsi1:vm-105-disk-0
Start the VMs
Once the configuration is correct, start the VMs on either lab1 or lab2.
On lab1, start vm-111:
qm start 111
On lab2:
qm start 112
Verify VM Status
Check the status of the VMs to ensure they are running:
qm status 111
status: running
qm status 112
status: running
Optional: Migrate VMs for Balance
If needed those VMs can now be migrated live. To migrate vm-111 to lab2:
qm migrate 111 lab2 --online
Remember there may not be a valid zpool snapshot for vm-111 on lab2, so it may take some time. I’ll expand on this failure recovery procedure in a future article.
Extending ZFS Pool zfs-iscsi1
When I needed to expand the space available in zfs-iscsi1 on lab2, the process was pretty straight forward. Follow the same instructions in my first article to create a new iSCSI target and 250GB LUN for each host in the cluster. For instance, I created lab1_lun4, lab2_lun4, and lab3_lun4. Use the iscsiadm commands for discovery against the QNAP NAS network interface that each lab cluster node is using. Follow same iscsiadm, lsblk and sgdisk commands to locate and label the new disk and enable auto login.
Extend the existing zfs-iscsi1 zpool with zpool add command. Use the newly added disk name as shown by lsblk, in this example /dev/sdh is the newly added disk:
zpool add zfs-iscsi1 /dev/sdh
zpool list
NAME SIZE ALLOC FREE ... FRAG CAP DEDUP HEALTH
rpool 928G 4.44G 924G 0% 0% 1.00x ONLINE
zfs-ssd1 476G 109G 367G 1% 22% 1.00x ONLINE
zfs-iscsi1 1.21T 183G 1.03T 5% 14% 1.00x ONLINE
Expanded Architecture Enabling More Replication
To ensure dedicated high speed access to iSCSI disk LUNs and also to enable replication to multiple hosts, I revised the architecture to include an additional private 2.5Gb network segment dedicated to migration traffic. Using a dedicated 2.5Gb switch
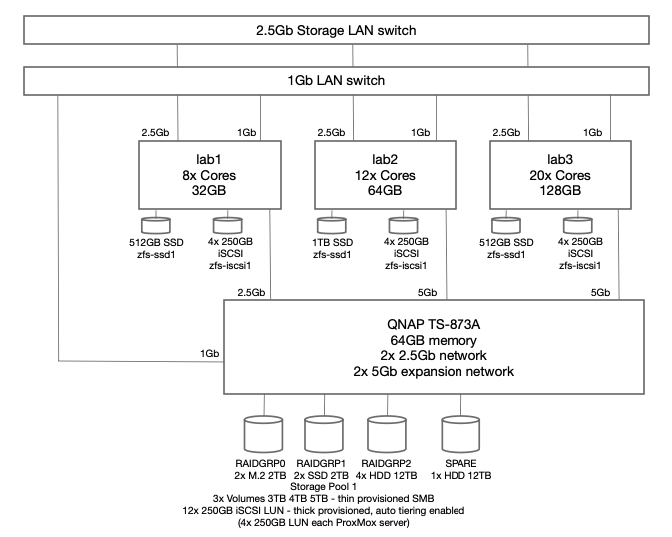
Specific migration configuration settings only apply to the entire cluster including all nodes. Unless otherwise configured, ProxMox will use the primary cluster IP addresses and NICs for migration traffic. Problem is that is typically the production network adapter and could only be 1 Gbs. Since I was using a dedicated NIC for iSCSI access, I decided to use dual NIC cards and use a dedicated 2.5Gb network segment for migration traffic, while the other NIC is dedicated to iSCSI traffic via a unique IPv4 subnet for each server connection to the QNAP server.
Migration traffic is encrypted using an SSH tunnel by default. On secure, completely private networks this can be disabled to increase performance.
migration: type=insecure,network=10.3.11.0/24
Once the datacenter.cfg file has been updated, shortly (usually less than 30 seconds) ProxMox will start using the new network for migration traffic. Watching the migration progress dialog box we can see that transfer rates are routinely hitting 200MB/s and some peaks at 300MB/s. Bonus all that traffic does not compete with either Production network or iSCSI network traffic.
Next I’ll explore the HA Clustering capabilities of ProxMox.
After struggling to recover a moderately important VM on one of my home lab servers running generic CentOS libvirt, a colleague suggested I investigate ProxMox as a replacement to libvirt since it offers some replication and clustering features. The test was quick and I was very impressed with the features available in the community edition. It took maybe 15-30 minutes to install and get my first VM running. I quickly rolled ProxMox out on my other two lab servers and started experimenting with replication and migration of VMs between the ProxMox cluster nodes.
The recurring pain I was experiencing with VM hosts centered around primarily failed disks, both HDD and SSD, but also a rare processor failure. I had already decided to invest a significant amount of money into a commercial NAS (one of the major failures was irrecoverability of a TrueNAS VM with some archive files). Although investing in a QNAP or Synology NAS device would introduce a single point of failure for all the ProxMox hosts, I decided to start with one and see if later I could justify the cost for a redundant QNAP. More on that in another article.
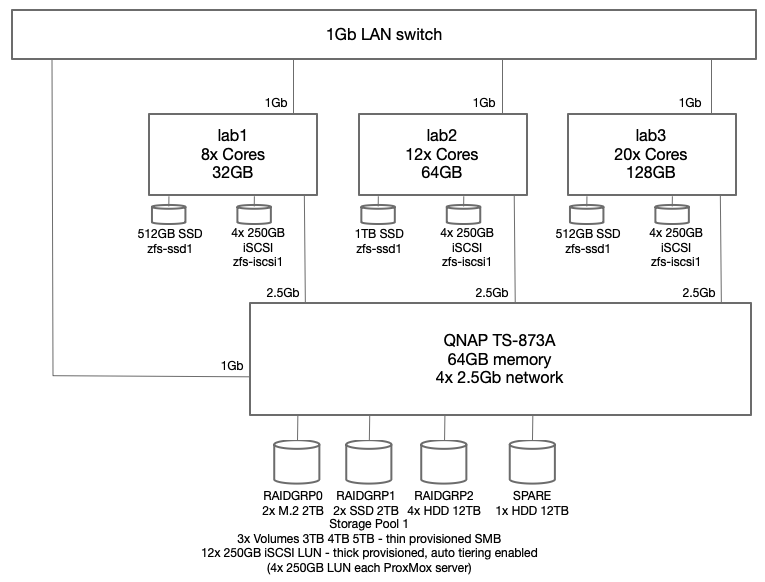
The current architecture of my lab environment now looks like this:
Figure 1 – ProxMox Storage Architecture
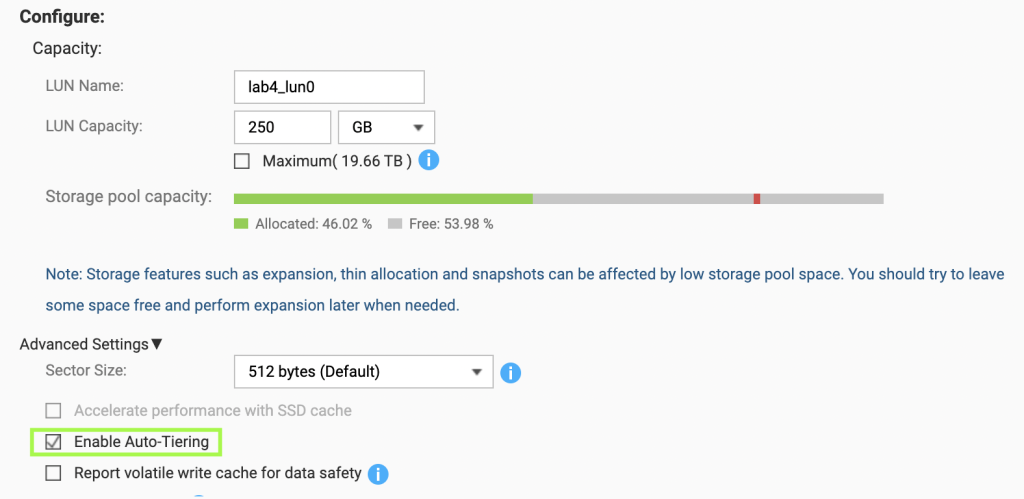
To reduce the complexity, I chose to setup ProxMox for replication of VM guests and allow live migration but not to implement HA clustering yet. To support this configuration, the QNAP NAS device is configured to advertise a number of iSCSI LUNs, each with a dedicated iSCSI target hosted on the QNAP NAS system. Through trial and error testing I decided to configure four (4) 250GB LUNs for each ProxMox host. All four (4) of those LUNs are added into a new ZFS zpool making 1TB of storage available to each ProxMox host. Since this iteration of the design is not going to use shared cluster aware storage, each host has a dedicated 1TB ZFS pool (zfs-iscsi1) however each pool is named the same to facilitate replication from one ProxMox host to another. For higher performance requirements, I also employ a single SSD on each host which have also been placed into a ZFS pool (zfs-ssd1) named the same on each host.
A couple of notes on architecture vulnerabilities. Each ProxMox host should have dual local disks to allow ZRAID1 mirroring. I chose to have only single SSD in each host to start with and tolerate a local disk failure – replication will be running on critical VM to limit the loss in the case of a local SSD failure. Any VM that cannot tolerate any disk failure will only use the iSCSI disks.
Setup ProxMox Host and Add ProxMox Hosts to Cluster
Assuming the new host has dual disks that can be mirrored, chose Advanced for the boot disk and select ZRAID1 – this will allow you to select the two disks to be mirrored
Follow the installation prompts and sign in on the console after the system reboots
Setup the local SSD as ZFS pool “zfs-ssd1”
Use lsblk to identify local disks attached to find the SSD
lsblk
sda 8:0 0 931.5G 0 disk
├─sda1 8:1 0 1007K 0 part
├─sda2 8:2 0 1G 0 part
└─sda3 8:3 0 930.5G 0 part
sdb 8:16 0 476.9G 0 disk
sdc 8:32 0 931.5G 0 disk
├─sdc1 8:33 0 1007K 0 part
├─sdc2 8:34 0 1G 0 part
└─sdc3 8:35 0 930.5G 0 part
zpool create zfs-ssd1 /dev/sdb
zpool list
NAME SIZE ALLOC FREE ... FRAG CAP DEDUP HEALTH
rpool 928G 4.44G 924G 0% 0% 1.00x ONLINE
zfs-ssd1 476G 109G 367G 1% 22% 1.00x ONLINE
Update /etc/pve/storage.cfg and ensure ProxMox host is listed as a node for zfs-ssd1 pool. Initial entry can only list the first node. When adding another ProxMox host, the new host gets added to the nodes list.
zfspool: zfs-ssd1
pool zfs-ssd1
content images,rootdir
mountpoint /zfs-ssd1
nodes lab2,lab1,lab3
Note the /etc/pve files are maintained in a global filesystem and any edits while on one host will reflect on all other ProxMox cluster nodes.
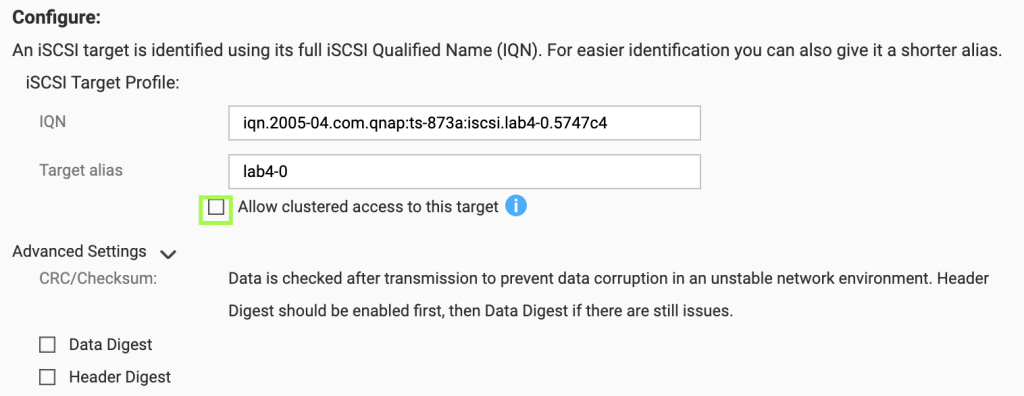
Configure QNAP iSCSI targets with attached LUNs
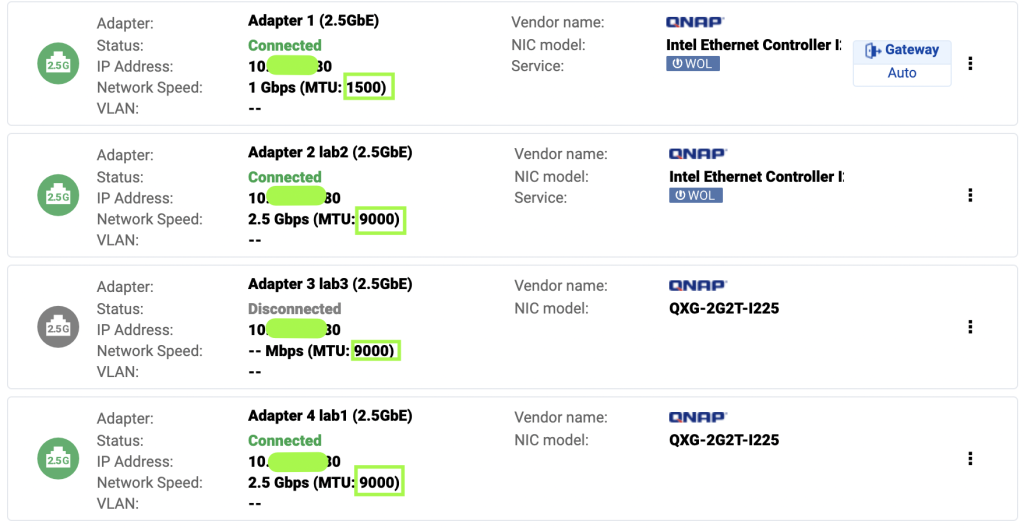
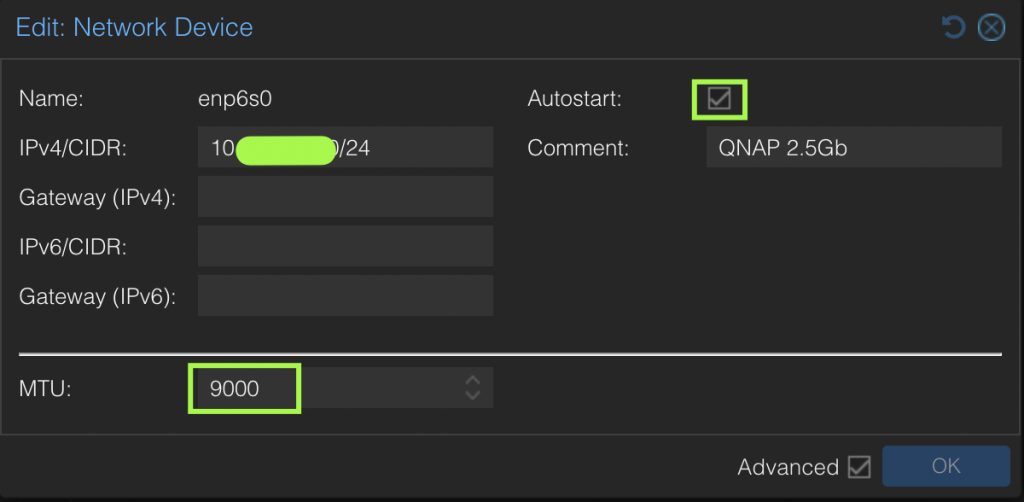
Configure network adapter on ProxMox host for the direct connection to QNAP, ensure MTU is set 9000 and speed 2.5Gb
Setup iSCSI daemon and disks for creation of zfs-iscsi1 ZFS pool
Update /etc/iscsi/iscsid.conf to setup automatic start, CHAP credentials
Validate connection to QNAP, ensure no sessions exist do discovery of published iSCSI targets. Ensure to use the high speed interface address of the QNAP.
In the output of the discovery it appears there are two sets of targets. This is due to multiple network adapters under Network Portal on the QNAP being included in the targets. We will use the high speed address (10.3.1.80) for all the iscsiadm commands.
Execute login to each iSCSI target
iscsiadm -m node -T iqn.2005-04.com.qnap:ts-873a:iscsi.lab1-0.5748c4 -p 10.3.1.80:3260 -l
Logging in to [iface: default, target: iqn.2005-04.com.qnap:ts-873a:iscsi.lab1-0.5748c4, portal: 10.3.1.80,3260]
Login to [iface: default, target: iqn.2005-04.com.qnap:ts-873a:iscsi.lab1-0.5748c4, portal: 10.3.1.80,3260] successful.
iscsiadm -m node -T iqn.2005-04.com.qnap:ts-873a:iscsi.lab1-1.5748c4 -p 10.3.1.80:3260 -l
Logging in to [iface: default, target: iqn.2005-04.com.qnap:ts-873a:iscsi.lab1-1.5748c4, portal: 10.3.1.80,3260]
Login to [iface: default, target: iqn.2005-04.com.qnap:ts-873a:iscsi.lab1-1.5748c4, portal: 10.3.1.80,3260] successful.
iscsiadm -m node -T iqn.2005-04.com.qnap:ts-873a:iscsi.lab1-2.5748c4 -p 10.3.1.80:3260 -l
Logging in to [iface: default, target: iqn.2005-04.com.qnap:ts-873a:iscsi.lab1-2.5748c4, portal: 10.3.1.80,3260]
Login to [iface: default, target: iqn.2005-04.com.qnap:ts-873a:iscsi.lab1-2.5748c4, portal: 10.3.1.80,3260] successful.
iscsiadm -m node -T iqn.2005-04.com.qnap:ts-873a:iscsi.lab1-3.5748c4 -p 10.3.1.80:3260 -l
Logging in to [iface: default, target: iqn.2005-04.com.qnap:ts-873a:iscsi.lab1-3.5748c4, portal: 10.3.1.80,3260]
Login to [iface: default, target: iqn.2005-04.com.qnap:ts-873a:iscsi.lab1-3.5748c4, portal: 10.3.1.80,3260] successful.
Verify iSCSI disks were attached
lsblk
NAME MAJ:MIN RM SIZE RO TYPE MOUNTPOINTS
sda 8:0 0 931.5G 0 disk
├─sda1 8:1 0 1007K 0 part
├─sda2 8:2 0 1G 0 part
└─sda3 8:3 0 930.5G 0 part
sdb 8:16 0 476.9G 0 disk
├─sdb1 8:17 0 476.9G 0 part
└─sdb9 8:25 0 8M 0 part
sdc 8:32 0 931.5G 0 disk
├─sdc1 8:33 0 1007K 0 part
├─sdc2 8:34 0 1G 0 part
└─sdc3 8:35 0 930.5G 0 part
sdd 8:48 0 250G 0 disk
sde 8:64 0 250G 0 disk
sdf 8:80 0 250G 0 disk
sdg 8:96 0 250G 0 disk
Update /etc/pve/storage.cfg for the zfs-iscsi1 ZFS pool to show up in the ProxMox GUI. Initial entry can only list the first node. When adding another ProxMox host, the new host gets added to the nodes list.
zfspool: zfs-iscsi1
pool zfs-iscsi1
content images,rootdir
mountpoint /zfs-iscsi1
nodes lab2,lab1,lab3
Installation of HPE ArcSight Enterprise Security Manager (ESM) 6.9.1 on CentOS 7.1 is substantially easier with engineering adding a “pre-installation” setup script to this version. For a smooth installation, there are still a few steps we need to take .. outlined below.
Base install of CentOS 7.1, minimal packages but add Compatibility Libraries. Be sure you use the CentOS-7-x86_64-Minimal-1503-01.iso revision since more recent releases of CentOS have other quirks that may make the ESM install or execution fail. Ensure /tmp has at least 5GB of free space and /opt/arcsight has at least 50GB of usable space – I’d suggest going with at least:
/boot – 500MB
/ – 8GB+
swap – 6GB+
/opt – 85GB+
Ensure some needed (and helpful) utilities are installed, since the minimal distribution does not include these and unfortunately the ESM install script just assumes they are there .. if they aren’t, the install will eventually fail.
yum install -y bind-utils pciutils tzdata zip unzip
Edit /etc/selinux/config and disable (or set to permissive) .. the CORR storage engine install will fail with “enforcing” mode of SElinux. I’ll update this at some point with how to leave SElinux in enforcing mode.
Disable the netfilter firewall (again, at some point I’ll update this with the rules needed to leave netfilter enabled).
(optionally edit /etc/ntp.conf to select the NTP servers you want your new ESM system to use)
systemctl enable ntpd; systemctl start ntpd
Edit /etc/rsyslog.conf and enable forwarding of syslog events to your friendly neighborhood syslog SmartConnector (optional, but otherwise how do you monitor your ESM installation?) .. you can typically just uncomment the log handling statements at the bottom of the file and fill in your syslog SmartConnector hostname or IP address. Note the forward statement I use only has a single at sign – indicating UDP versus TCP designated by two at signs:
$ActionQueueFileName fwdRule1 # unique name prefix for spool files
$ActionQueueMaxDiskSpace 1g # 1gb space limit (use as much as possible)
$ActionQueueSaveOnShutdown on # save messages to disk on shutdown
$ActionQueueType LinkedList # run asynchronously
$ActionResumeRetryCount -1 # infinite retries if host is down
# remote host is: name/ip:port, e.g. 192.168.0.1:514, port optional
#*.* @@remote-host:514
*.* @10.10.10.5:514
Restart rsyslog after updating the conf file
systemctl restart rsyslog
Optionally add some packages that support trouble shooting or other non-ESM functions you run on the ESM server, such as system monitoring
yum install -y mailx tcpdump
Untar the ESM distribution tar ball, ensure the files are owned by the “arcsight” user, then run the Tools/prepare_system.sh to adjust the maximum open files and other requirements that we used to manually update in previous releases. NOTE: in 6.9.1 there are some previous “shadow” requirements that are now enforced (eg. you don’t get to change) .. such as the application owner account must be “arcsight”, the installation directory must be “/opt/arcsight”. The “prepare_system.sh” script will check to see if there already is an “arcsight” user and if not, will create it. I usually manually create all the common users on my various systems since I want them to have the same uid / gid across all my systems.
Run the Tools/prepare_system.sh script as “root” user
Install your ESM 6.9.1 console on Windows, Linux or Mac OS X .. although the web interface is much richer in the last couple releases, you’ll still need to use the console for content creation and editing.
Optionally extend the session timeout period for the web interface. There still isn’t an easy setting to do this in the GUI, so get into command line on your ESM server and edit or add the following lines .. which indicate the timeout period in seconds. The default is around five (5) minutes. You should be able to edit these configuration files as the “arcsight” user, but I typically restart the services as “root”.
Restart the ESM services .. I typically run this as “root”
/etc/init.d/arcsight_services stop
/etc/init.d/arcsight_services start
Optionally configure the manager to display a static banner at the top of each console interface so you can have multiple consoles open and know what manager each is connected to (cool!):
Edit /opt/arcsight/manager/config/server.properties and add server.staticbanner.* properties (backgroundcolor, textcolor, text). Both backgroundcolor and textcolor take black, blue, cyan, gray, green, magenta, orange, pink, red, white, yellow as acceptable arguments. Text is the identifier you would like that manager to display, such as “super-awesome-production-box”
server.staticbanner.textcolor=green
server.staticbanner.backgroundcolor=black
server.staticbanner.text=esm691
Restart the ESM manager service .. I typically run this as “root”
/etc/init.d/arcsight_services stop manager
/etc/init.d/arcsight_services start manager
If you are going to install any SmartConnectors on the system hosting your Enterprise Security Manager, check out my post regarding required libraries for CentOS and RedHat, before you try to run the Linux SmartConnector install. This includes any Model Import Connectors (MIC) or forwarding connectors (SuperConnectors).
This project aims to provide an efficient way to provide mutual protection from deemed bad actors that attack Internet facing servers. The result will be an open source set of communication tools that use established protocols for high speed and light weight transmission of attacker information to a variable number of targets (unicasting to a possibly large number of hosts).
Background
There are many open source firewall technologies in widespread use, most based on either packet filter (pf) or netfilter (iptables). There is much technology that provides network clustering (for example, OpenBSD’s CARP and pfsync; netfilter; corosync and pacemaker), however it’s difficult for disparate (loosely coupled) servers to communicate the identity of attackers in real time to a trusted community of (tightly coupled) peers. Servers or firewalls that use state-table replication techniques, such as pfsync or netfilter, have a (near) real-time view of pass/block decisions other members have made. There needs to be a mechanism for loosely coupled servers to share block decisions in a similar fashion.
Our goal is to create an open source tool for those of us that have multiple Internet facing servers to crowd source information that will block attackers via the firewall technology of choice (OpenBSD/FreeBSD pf/pfSense, iptables, others).
Project Page
All project files are still private yet, but when we publish to GitHub or SourceForge, this section will be updated.
In the appliance versions of most ArcSight products, there is the ability to set the user session timeout period. Typically this defaults to somewhere between five (5) and 15 minutes – good for a default but incredibly annoying for any real user. In ArcSight Enterprise Security Manager (ESM), there is no such GUI configuration that allows modification of the user session timeout – so this is what has worked for me:
Set ArcSight Command Center (ACC) timeout greater than 900 seconds (15 minutes) – set to 28800 seconds (8 hours) vi /opt/arcsight/manager/config/server.properties
service.session.timeout=28800
/sbin/service arcsight_services stop all
/sbin/service arcsight_services start all
Default is 600 seconds = 5 minutes.
In 6.5, 6.5.1 and 6.8 you also need to add the following for the Logger interface in ESM:
vi /opt/arcsight/logger/userdata/logger/user/logger/logger.properties
server.search.timeout=28800
/sbin/service arcsight_services stop all
/sbin/service arcsight_services start all
Default is 600 seconds = 5 minutes.
Yes, eight (8) hours may seem like a long time, so chose what is appropriate for your site. 🙂
[Update 2016/04/15]: Installing Logger 6.2 on CentOS 7.1
CentOS (or RHEL) 7 changed a number of things in the OS for command and control, such as the facility to control services – for example, rather than “service” the command is now “systemctl”. Below I outline a “quickstart” way to get HPE ArcSight Logger 6.2 installed on CentOS 7.1 (minimal distribution). Of course you want to read the Logger Installation Guide, Chapter 3 “Installing Software Logger on Linux” for the complete instructions and be sure you understand the commands I suggest below before you run them. No warranties here, just suggestions. 😉
Do a base install of CentOS (or RHEL) 7.1, minimal packages. I often suggest adding in Compatibility Libraries, however for this Logger 6.2 install, I just used the base install. Ensure /tmp has at least 5GB of free space and /opt/arcsight has at least 50GB of usable space – I’d suggest going with at least:
/boot – 500MB
/ – 8GB+
swap – 6GB+
/opt – 85GB+
Ensure some needed (and helpful) utilities are installed, since the minimal distribution does not include these and unfortunately the Logger install script just assumes they are there .. if they aren’t, the install will eventually fail (such as no unzip binary).
yum install -y bind-utils pciutils tzdata zip unzip
Unlike my ESM install, for Logger, I left SELinux enabled and things appear to be working alright, but your mileage may vary. If in doubt, disable it and try again. To disable, edit /etc/selinux/config and set the mode to “disable” (or at least to “permissive”)
Disable the netfilter firewall (again, at some point I’ll update this with the rules needed to leave netfilter enabled).
(optionally edit /etc/ntp.conf to select the NTP servers you want your new Logger system to use)
systemctl enable ntpd; systemctl start ntpd
Edit /etc/rsyslog.conf and enable forwarding of syslog events to your friendly neighborhood syslog SmartConnector (optional, but otherwise how do you monitor your Logger installation?) .. you can typically just uncomment the log handling statements at the bottom of the file and fill in your syslog SmartConnector hostname or IP address. Note the forward statement I use only has a single at sign – indicating UDP versus TCP designated by two at signs:
$ActionQueueFileName fwdRule1 # unique name prefix for spool files
$ActionQueueMaxDiskSpace 1g # 1gb space limit (use as much as possible)
$ActionQueueSaveOnShutdown on # save messages to disk on shutdown
$ActionQueueType LinkedList # run asynchronously
$ActionResumeRetryCount -1 # infinite retries if host is down
# remote host is: name/ip:port, e.g. 192.168.0.1:514, port optional
#*.* @@remote-host:514
*.* @10.10.10.5:514
Restart rsyslog after updating the conf file
systemctl restart rsyslog
Optionally add some packages that support trouble shooting or other non-Logger functions you run on the Logger server, such as system monitoring
yum install -y mailx tcpdump
Update the maximum number of processes and open files our Logger software can use:
Backup the current settings: cp /etc/security/limits.d/20-nproc.conf /etc/security/limits.d/20-nproc.conf.orig
Drop in new config file (assuming you have copy/pasted the following settings into /root/20-nproc.conf): cp 20-nproc.conf /etc/security/limits.d/20-nproc.confContents of the /etc/security/limits.d/20-nproc.conf file becomes: # Default limit for number of user's processes to prevent
# accidental fork bombs.
# See rhbz #432903 for reasoning.
* soft nproc 10240
* hard nproc 10240
* soft nofile 65536
* hard nofile 65536
root soft nproc unlimited
Reboot to enable the new settings.
Add an unprivileged user “arcsight” to own the application and run as: groupadd -g 1000 arcsight
useradd -u 1000 -g 1000 -d /home/arcsight -m -c "ArcSight" arcsight
passwd arcsight
Ensure the *parent* directory for the Logger software exists. Standard locations for installation of ArcSight products should be /opt/arcsight, so for example, we’re going to install our Logger software at /opt/arcsight/logger. cd /opt
mkdir /opt/arcsight
Run the Logger installation binary as “root” user
./ArcSight-logger-6.2.0.7633.0.bin
After the installation script completes successfully, you should be able to login to the console via a web browser https://<hostname>
Default username “admin” with default password “password”. You’ll be forced to change the admin password on login.
If you are going to install any SmartConnectors on the system hosting your Logger, check out my post regarding required libraries for CentOS and RedHat, before you try to run the Linux SmartConnector install. This includes any Model Import Connectors (MIC) or forwarding connectors (SuperConnectors).
[Update 2016/03/11]: Starting with SmartConnector 7.1.7 (I think, might be a rev or two earlier), there are a couple more libraries that are needed to successfully install the SmartConnector on Linux. Include libXrender.i686 libXrender.x86_64 libgcc.i686 libgcc.x86_64 yum install libXrender.i686 libXrender.x86_64 libgcc.i686 libgcc.x86_64
These notes describe an installation of HP ArcSight Logger 6.0.1 on a CentOS 6.5 virtual machine.
For a test install of Logger 6, I built a CentOS vm with the following parameters:
Basic install from the CentOS 6.5 Minimum ISO
1 CPU with 2 cores
4GB memory
80GB virtual disk
1 bridged network adapter
Disk partition sizes:
root fs 6GB, swap 4GB, /home 2GB, /opt/arcsight 50GB, /archive 10GB, free space approximately 15GB
As soon as the system was up, I commented out the archive filesystem (will be re-mounted under the /opt/arcsight/logger directory) vi /etc/fstab
Installed the bind-utils package so I could use dig and friends, then did a full yum update: yum install bind-utils ntp
yum update
This turns the system into CentOS 6.6, but that’s still a supported system for Logger, so all’s good.
Next we prepare the system for Logger software install by adding a user and changing some of the system configuration.
Add a non-root user to own and run the Logger application: groupadd -g 1000 arcsight
useradd -u 1000 -g 1000 -d /home/arcsight -m -c "ArcSight" arcsight
passwd arcsight
Install libraries that Logger depends on: yum install glibc.i686 libX11.i686 libXext.i686 libXi.i686 libXtst.i686
yum install zip unzip
Update the maximum number of processes and open files our Logger processes can have: cp 90-nproc.conf /etc/security/limits.d/90-nproc.conf
Contents of the /etc/security/limits.d/90-nproc.conf file becomes: # Default limit for number of user's processes to prevent
# accidental fork bombs.
# See rhbz #432903 for reasoning.
* soft nproc 10240
* hard nproc 10240
* soft nofile 65536
* hard nofile 65536
root soft nproc unlimited
Turn off services we don’t need and turn on the ones we do need. Later we will write some iptables rules so we can turn the firewall back on when we’re done.
chkconfig iptables off
service iptables stop
chkconfig iscsi off
service iscsi stop
chkconfig iscsid off
service iscsid stop
ntpdate name-of-ntp-server-you-trust
chkconfig ntpd on
service ntpd start
All of these steps are packaged up here in centos-setup.shl: groupadd -g 1000 arcsight
useradd -u 1000 -g 1000 -d /home/arcsight -m -c "ArcSight" arcsight
passwd arcsight
cp 90-nproc.conf /etc/security/limits.d/90-nproc.conf
yum install glibc.i686 libX11.i686 libXext.i686 libXi.i686 libXtst.i686
yum install zip unzip
chkconfig iptables off
service iptables stop
chkconfig iscsi off
service iscsi stop
chkconfig iscsid off
service iscsid stop
ntpdate 0.centos.pool.ntp.org
chkconfig ntpd on
service ntpd start
Turns out since we need 3+GB of free space in /tmp, I needed to extend the root filesystem .. I only allocated 2GB to begin with. Extend the root logical volume (lv_root) by adding 1,000 Physical Extents (4MB each):
Boot into rescue mode .. do NOT mount linux partitions, then drop to a shell
vgs
vgchange -a y vg_swlogger1
lvextend -l +1000 /dev/vg_swlogger1/lv_root
e2fsck -f /dev/vg_swlogger1/lv_root
resize2fs /dev/vg_swlogger1/lv_root
Now reboot and confirm there is at least 4GB of free space in /tmp. Could also have mounted a ram filesystem, but this will do as I’m conserving my memory on the host.
Upload the Logger installer binary and also the license file to the system into root’s home directory (or where you have space).
As root, run the Logger software install: chmod u+x ArcSight-logger-6.0.0.7307.1.bin
./ArcSight-logger-6.0.0.7307.1.bin
Word of advice .. if doing this in a vm, run the install from the vm console since it’s possible the vm will be busy enough a remote ssh session could get disconnected – and the install will not complete properly.
After the install, we should be able to open a browser by navigating to https://name-of-vm-here
Sign in as arcsight / password then navigate to the System Administration section to change the admin password.
Why does Red Hat Enterprise Linux 6 invalidate / discard packets when the route for outbound traffic differs from the route of incoming traffic?
Issue Description
Why does Red Hat Enterprise Linux 6 invalidate / discard packets when the route for outbound traffic differs from the route of incoming traffic?
Why does Red Hat Enterprise Linux 6 differ from Red Hat Enterprise Linux 5 in handling asymmetrically routed packets?
Temporary change
To accept asymmetrically routed (outgoing routes and incoming routes are different) packets set “rp_filter” to 2 and restart networking, by running the following commands:
Persistent change
To make this behaviour persistent across reboots, modify /etc/sysctl.conf and make the following change prior to reboot:
net.ipv4.conf.default.rp_filter = 2
Root Cause
RHEL6 (unlike RHEL5) defaults to using ‘Strict’ Reverse Path Forwarding (RPF) filtering.
Comments
The sysctl net.ipv4.conf.default.rp_filter selects the default RPF filtering setting for IPv4 networking. (It can be overridden per network interface through net.ipv4.interfacename.rp_filter).
Both RHEL6 and RHEL5 ship with a default /etc/sysctl.conf that sets this sysctl to 1, but the meaning of this value is different between the RHEL6 and the RHEL5 kernel.
Starting with SmartConnector 7.1.7 (I think, might be a rev or two earlier), there are a couple more libraries that are needed to successfully install the SmartConnector on Linux. Include libXrender.i686 libXrender.x86_64 libgcc.i686 libgcc.x86_64 yum install libXrender.i686 libXrender.x86_64 libgcc.i686 libgcc.x86_64
[Update 2014/02/04]:
Simpler syntax for the install, using yum to do the automatic dependency processing, and .. a update for CentOS 6.4 64-bit. I believe RHEL 6.4 64-bit would also need these libraries. This worked for installing ArcSight SmartConnector 6.0.7 on CentOS 6.4 64-bit.
You could install like: yum install glibc.i686 libX11.i686 libXext.i686 libXi.i686 libXtst.i686
[Original post]
While installing an ArcSight SmartConnector 6.0.2 on RedHat Enterprise Linux 6.2 64-bit, the initial install runs successfully, however the connector configuration never kicks off, then install just claims it is done. runagentsetup.sh fails with Error occurred during initialization of VM .. java/lang/NoClassDefFoundError: java/lang/Object .. obviously a pretty major Java error.
Turns out there are some additional libraries that need to be loaded in addition to what is listed in the documentation.
Some research leads me to believe there were some base libraries that may be missing from the vanilla RHEL 6.2 64 bit install. Basic Server + Desktop configuration was selected and all libraries referenced in the ESM 6.0c Install Guide and SmartConnector User Guide were installed. Tracing through all the dependencies created this exact list of of libraries that are required to be installed on RHEL 6.2 64 bit:
Note the specific X libraries versus the generic list as shown in the connector user guide. What was interesting about these is that they did NOT all install when doing a wildcard rpm install, and additionally did not report any failures. After some trial and error, on my system it appears the 32 bit X libraries needed to be installed individually for some reason. You may want to use rpm -q -a to verify each of the libraries successfully installed. Once all the above libraries were installed, the connector installation worked as expected.
A tarball with the libraries can be downloaded from here.
Extract the libraries, change into the resulting directory, then you can use the following brute force syntax to determine which libraries are not installed and install them:
At least this time, I’m using Linux software RAID for a RAID1 mirroring configuration. When I determined there was a disk failure, I used the following mdadm commands to remove the bad drive:
– Fail and remove all /dev/sdb partitions (/dev/sdb1, /dev/sdb2) # mdadm --manage /dev/md0 --fail /dev/sdb1
mdadm: set /dev/sdb1 faulty in /dev/md0
# mdadm --manage /dev/md0 --remove /dev/sdb1
mdadm: hot removed /dev/sdb1
# mdadm --manage /dev/md1 --fail /dev/sdb3
mdadm: set /dev/sdb3 faulty in /dev/md1
# mdadm --manage /dev/md1 --remove /dev/sdb3
mdadm: hot removed /dev/sdb3
– Shutdown and replace the bad disk (assuming you have been able to replace with the exact disk)
– Copy the partition table from the surviving disk # sfdisk -d /dev/sda | sfdisk /dev/sdb
– Re-attach the partitions from /dev/sdb to the RAID1 mirrors: # mdadm --manage /dev/md0 --add /dev/sdb1
# mdadm --manage /dev/md1 --add /dev/sdb2
You should now see the md devices syncing up by: # cat /proc/mdstat
Personalities : [raid1]
md0 : active raid1 sda1[1] sdb1[2]
5139084 blocks [2/1] [U_]
[======>.......] recovery = 49.3% ...
Once the sync completes, install grub on both the drives again: # grub
grub> root (hd0,0)
grub> setup (hd0)
grub> root (hd1,0)
grub> setup (hd1)