Updated 2025/03/12 – Additional migration configuration
In my previous post How to Build a ProxMox Hypervisor Cluster with NAS Disk I described the configuration of QNAP NAS iSCSI LUNs to support ProxMox hypervisor servers with the goal of highly available high performance disk. In this post I will outline the configuration of VMs within the ProxMox cluster to gain disk replication across specific hypervisor hosts. Replication is a pretty slick and painless way to provide (higher) availability of VMs both for maintenance activities as well as host node failures without the complexity of full HA Cluster configuration. I do have pretty substantial experience with Linux Virtual Sever (LVS) and commercial clustering solutions, so I will likely address the ProxMox version of that capability in a future article.
To recap from my previous article, each of the three (3) ProxMox hosts has a pair of mirrored HDD, which are only used for ProxMox OS. Each host also has a single SSD for the occasional IOPs hungry VM. Although single local disk does present a failure risk, at this point in my network design, that is a deliberate choice. Any VM that cannot tolerate that single point of failure is required to use the iSCSI zpool. Also the goal at this point is not to go overboard on elimination of every single point of failure, just the highest probabilities. At this point there are three (3) different hosts, three (3) separate UPS, all using multiple network adapters for performance management. QNAP NAS iSCSI volumes are used for disk redundancy.
Design
Adding replication to any of my ProxMox VMs is made straight forward by a couple of design choices. Every ProxMox host has the same ZFS zpool storage groups which are all named the same across each host – currently two: zfs-ssd1 (local SSD on each host) and zfs-iscsi1 (QNAP NAS served iSCSI LUNs dedicated to each host). Technically VMs could use the local ZFS rpool, however I’ve chosen to keep VM disks completely separate from local ProxMox OS storage.
Generally the entire process involves three simple steps: Create VM, Configure Replication, Request Migration.
Setup our VMs
We can create the guest VMs as usual, but must specify virtual disk volumes within the zfs-ssd1, zfs-iscsi1, or both ZFS storage pools.
Use host > zfs-ssd1 > Summary and host > zfs-iscsi1 > Summary pages in the UI to determine capacity left on each host. As you would expect, allocation of space for a VM needs to take place on all hosts on which that VM is desired to be replicated. Replicating a VM to all hosts will take 3x the storage allocation versus having no replication.
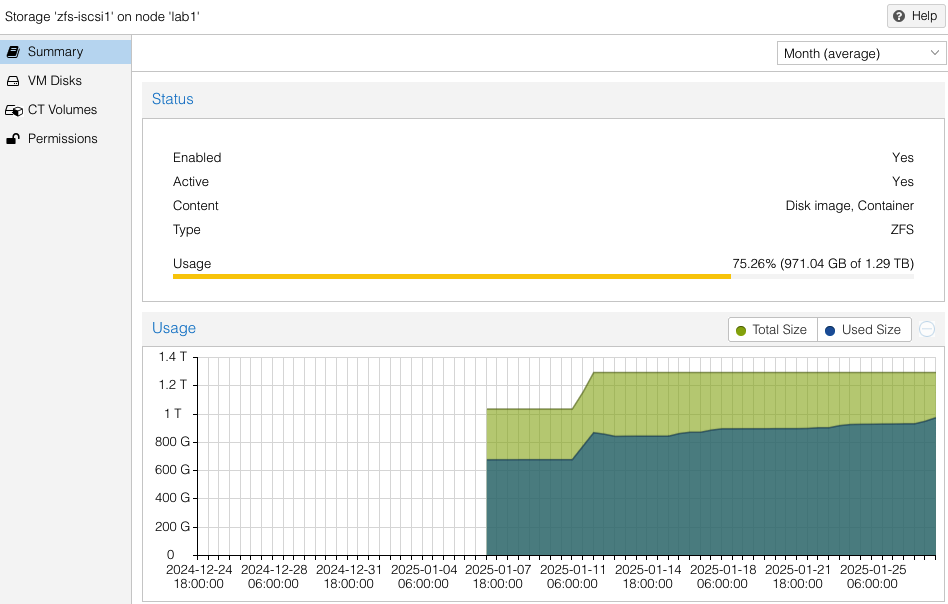
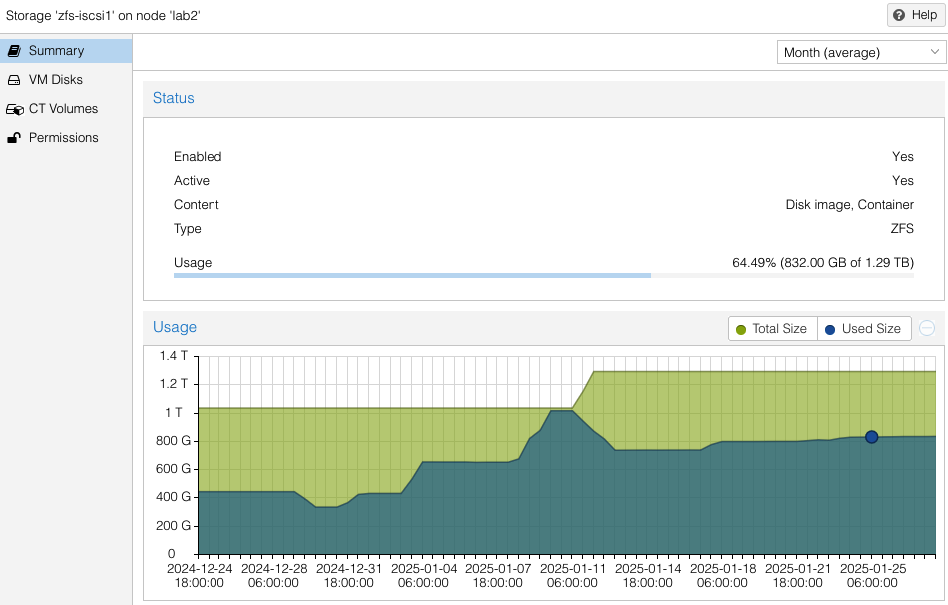
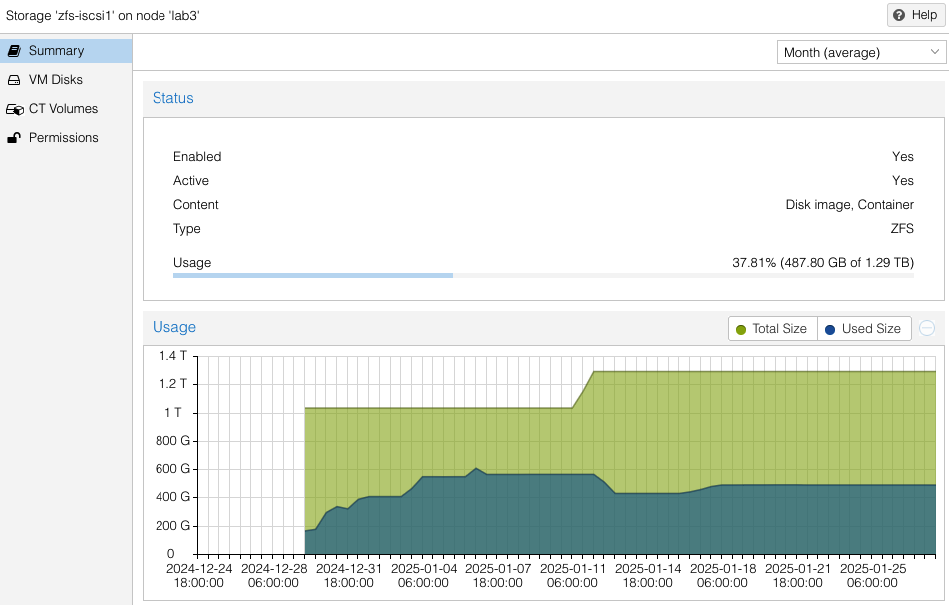
Note the availability and allocation of iSCSI storage on each of the three (3) ProxMox hosts. Might seem like lab2 was setup first, then lab3, then lab1. Actually both lab3 and lab1 were rebuilt after the initial three (3) node cluster was built. No loss of VMs occurred since I had all VMs replicated to the surviving cluster nodes while I did a rolling rebuild – there was always at least two cluster hosts. Also you can see at the beginning of January (01-11) zfs-iscsi1 pool was running out of space to allocate to either VMs or replication. I simply added another 250GB iSCSI LUN from the QNAP and extended the zfs-iscsi1 pool. More on that later.
VM Example – Replication to One Host
Our first VM will have multiple virtual disks located in the zfs-iscsi1 pool. These are all in the zfs-iscsi1 pool, however it could just as easy have a mix of zfs-iscsi1 and zfs-ssd1 virtual disks – presuming there is sufficient space available in the target host pools to which we intend to replicate. There is no restriction of number of pools used by the VM, just as long as those pool names are available on the target host.
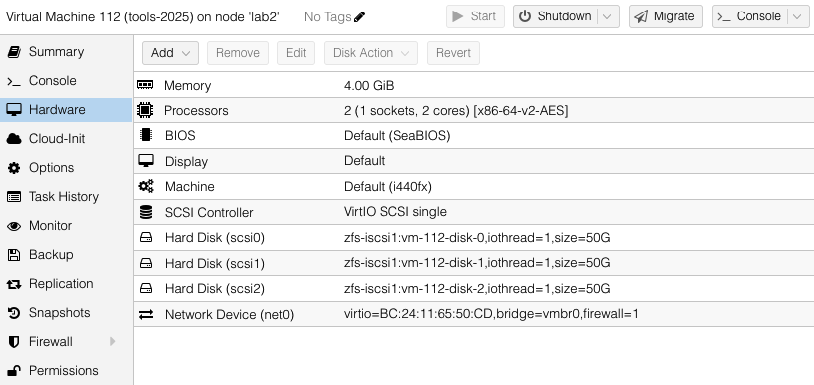
We will configure the tools-2025 VM to replicate to one other host – lab1.
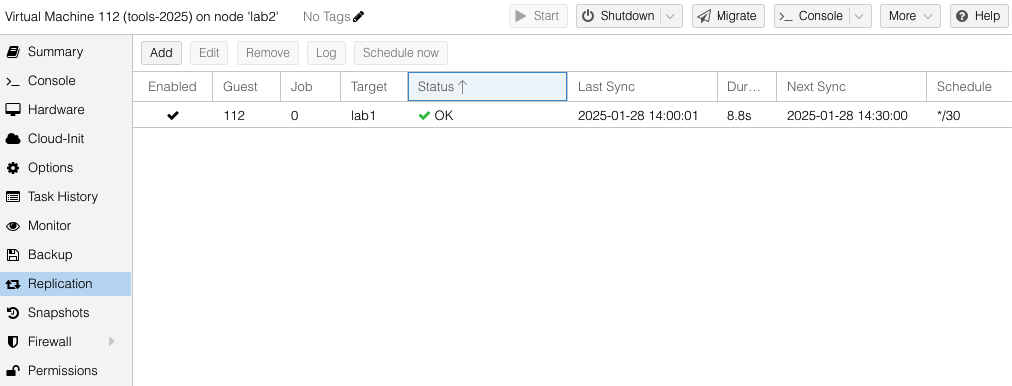
While creating the replication job, dialog boxes are used to select destination host(s) and the frequency of the replication. Sync jobs are run by taking zpool snapshots and sending those snapshots to the target host. Typical cadence would be every 15 minutes for sync of important VMs. Offline or less important VMs can sync hourly, nightly or even monthly – similar options as what you would find with Linux crontab jobs. Shortly after you have created the replication job, ProxMox will get it running in the background.
Difference Between Replicate and Migrate
Replication jobs run on a regular basis to push ZFS snapshots to the target hosts. When a migration of VM from one host to another is requested – literally a button push – the replication will speed the migration through the use of snapshots that are already on the target host. It is not necessary to have replication jobs enabled in order to migrate a VM, however it will take longer to migrate the more disk data that has to be synchronized. When migrating VMs with a large amount of storage that has not been replicated, it can take a very long time to run and possibly not successfully complete in the case of attempting live migrations. More on this in the next example.
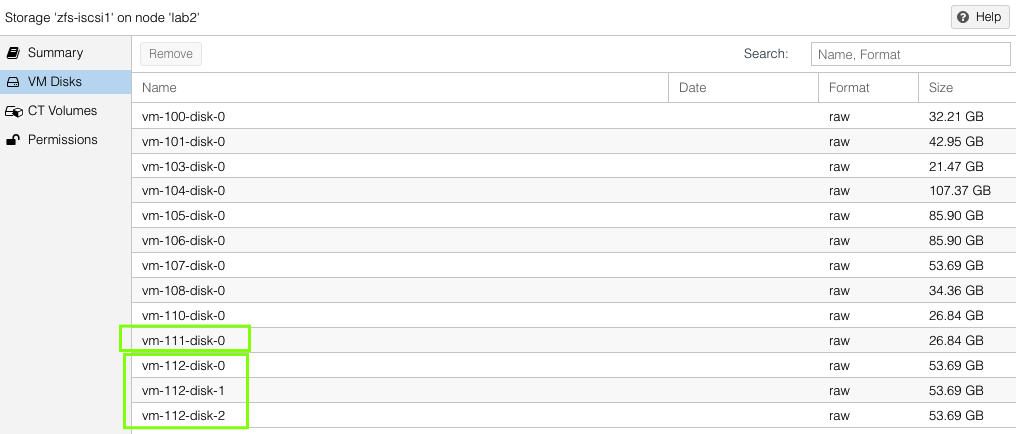
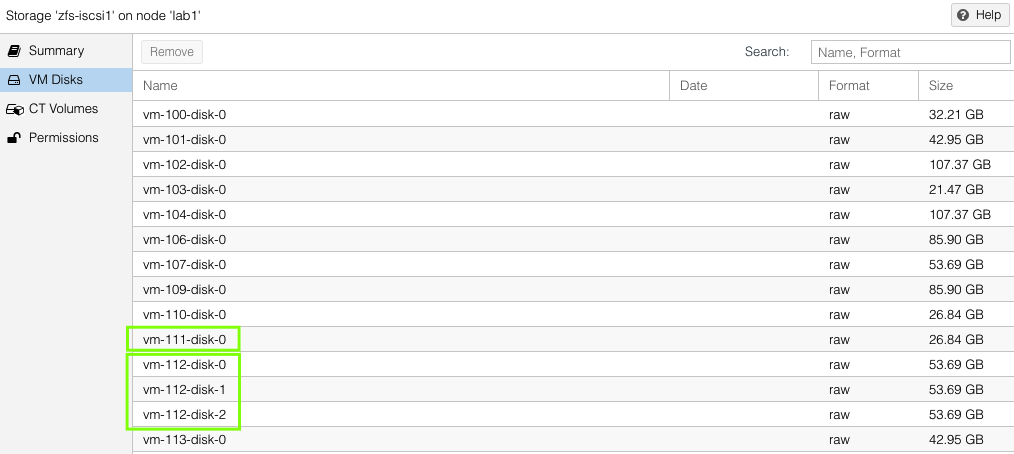
On each host, one can see the VM virtual disks that have been replicated by looking at host > ZFS pool name > VM Disks. This list will be the same on both the source and the target hosts.
VM Example – Replication to Two Hosts
Our second VM will have a single virtual disks located in the zfs-iscsi1 pool but is going to replicate to both of the other standby ProxMox hosts.
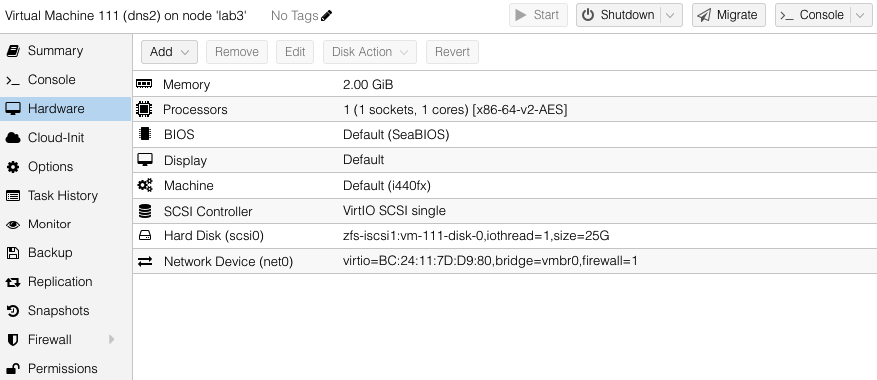
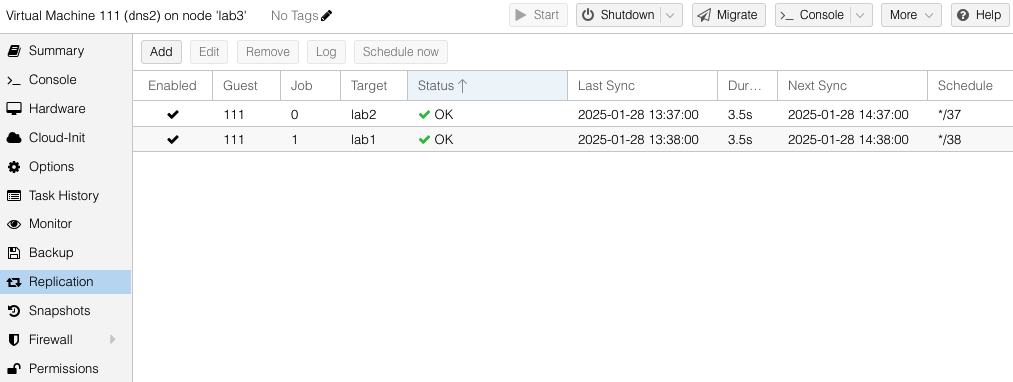
You can see both the replication jobs configured for VM 111, one to lab1 and the other to lab2. The replication job frequency is completely flexible however I have chosen to offset the schedules to reduce the disk use bandwidth.
Migration to Target Host
Migrations can be either offline (VM powered off) or live. To request a migration, we just select the Migrate button under the VM to be moved. Live migrations are just that – it replicates then moves a running VM to a target host with no perceived downtime.

The migrate menu will show you the current CPU and memory load of the available target systems. Fastest migrations are offline VMs that have had a recent replication job complete. Large VMs with lots of disk and memory and no prior replication have been known to fail to migrate – it is complicated to snapshot live memory for synchronization to a target host. All but the largest of VMs I have (looking at you elasticsearch) have no problems in migrating live in less than maybe 30 seconds for 4GB of memory.
In the case there is sufficient CPU and memory capacity on the target host, one can request a Bulk Migration operation from the main menu of the source host. I have used this several times to perform maintenance on cluster hosts where downtime is needed. The live migration of VMs is amazing .. makes life so much easier, with no VM reboot or downtime.

Failure Recovery
The scenarios I have outlined so far are most common, however one of the key use cases I wanted to be able to cover is what happens when a ProxMox host unexpected fails.
Fortunately a surviving host can start the failed VMs from last transferred snapshot. Clearly any data that was changed after the last replication snapshot will be lost. Not great for any VMs that are hosting applications / functions that are frequently changing, such as database servers. This ability is still sufficient for my use case and situation – low chance of host failure causing total data corruption (still not zero but far better than what I had before). A future article will focus on use of HA Cluster features including global cluster filesystems to cover those systems I have that have high(er) integrity requirements.
For example purposes, assume a three (3) node ProxMox hypervisor cluster without HA as I’ve described above. Two ZFS disk pools, zfs-ssd1 and zfs-iscsi1. We’ll reference six (6) guest VMs that have been created and configured to be using disk volumes within the zfs-iscsi1 pool. Currently two (2) VM are on each ProxMox host. Replication jobs have been configured on all VM to replicate every 15 minutes to both other ProxMox hosts. VMs on lab1 are vm-1 and vm-2. VMs on lab2 are vm-3 and vm-4. VMs on lab3 are vm-111 and vm-112. In this case assume lab3 has suddenly failed and is completely offline/powered off. The following process will allow a restart of vm-111 and vm-112 on either lab1 or lab2. For simplicity let’s restart vm-111 on lab1 and vm-112 on lab2.
Verify Replication
We need to confirm that the replication data for vm-111 and vm-112 exists on lab1 and lab2:
lab1:
  zfs list | grep "vm-111"

zfs-iscsi1/vm-111-disk-0 28.2G 323G 2.81G -
lab2:
  zfs list | egrep vm-112

zfs-iscsi1/vm-112-disk-0 83.9G 348G 33.1G -
zfs-iscsi1/vm-112-disk-1 71.5G 348G 20.7G -
zfs-iscsi1/vm-112-disk-2 55.2G 348G 4.42G -
Since we see datasets zfs-iscsi1/vm-111-disk-0 and zfs-iscsi1/vm-112-disk-0, the replication data appears to be intact.
Import the VM Configuration
Each VM has a configuration file in /etc/pve/qemu-server/ on the Proxmox cluster.
Check if the config files for vm-111 are on lab1 and vm-112 are present on lab2:
  lab1# ls /etc/pve/qemu-server

100.conf  101.conf  102.conf  103.conf	111.conf  113.conf
lab2# ls /etc/pve/qemu-server
100.conf 112.conf 118.confSince the config files exist, we can proceed to the next step. If those files do not exist, move the configuration files manually from the lab3 replicated configuration. ProxMox uses cluster filesystem for /etc/pve directory so those files should be in the /etc/pve/qemu-server/lab3 directory.
 lab1# cd /etc/pve
 lab1# mv nodes/lab3/qemu-server/111.conf qemu-server/
Next we need to verify manual adjustment of VM configuration not needed. Ensure the disk paths in the configuration files match the replicated ZFS datasets on the new host. Since our design uses the same ZFS zpool names on all ProxMox hosts, should not need to change the paths which will look like:
scsi0: zfs-iscsi1:vm-105-disk-0
Start the VMs
Once the configuration is correct, start the VMs on either lab1 or lab2.
On lab1, start vm-111:
qm start 111On lab2:
qm start 112Verify VM Status
Check the status of the VMs to ensure they are running:
  qm status 111

status: running

  qm status 112

status: running
Optional: Migrate VMs for Balance
If needed those VMs can now be migrated live. To migrate vm-111 to lab2:
qm migrate 111 lab2 --onlineRemember there may not be a valid zpool snapshot for vm-111 on lab2, so it may take some time. I’ll expand on this failure recovery procedure in a future article.
Extending ZFS Pool zfs-iscsi1
When I needed to expand the space available in zfs-iscsi1 on lab2, the process was pretty straight forward. Follow the same instructions in my first article to create a new iSCSI target and 250GB LUN for each host in the cluster. For instance, I created lab1_lun4, lab2_lun4, and lab3_lun4. Use the iscsiadm commands for discovery against the QNAP NAS network interface that each lab cluster node is using. Follow same iscsiadm, lsblk and sgdisk commands to locate and label the new disk and enable auto login.
Extend the existing zfs-iscsi1 zpool with zpool add command. Use the newly added disk name as shown by lsblk, in this example /dev/sdh is the newly added disk:
 zpool add zfs-iscsi1 /dev/sdh
 zpool list

NAME       SIZE  ALLOC   FREE  ...   FRAG    CAP  DEDUP    HEALTH
rpool      928G  4.44G   924G          0%     0%  1.00x    ONLINE
zfs-ssd1   476G   109G   367G          1%    22%  1.00x    ONLINE
zfs-iscsi1 1.21T  183G   1.03T         5%    14%  1.00x    ONLINE
Expanded Architecture Enabling More Replication
To ensure dedicated high speed access to iSCSI disk LUNs and also to enable replication to multiple hosts, I revised the architecture to include an additional private 2.5Gb network segment dedicated to migration traffic. Using a dedicated 2.5Gb switch
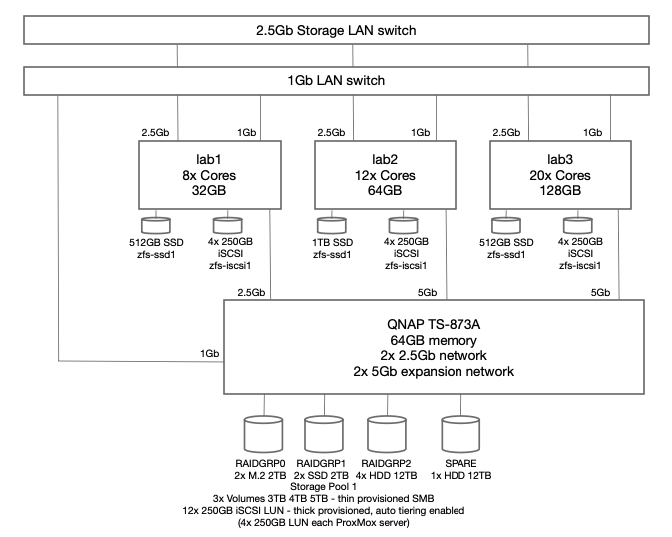
Specific migration configuration settings only apply to the entire cluster including all nodes. Unless otherwise configured, ProxMox will use the primary cluster IP addresses and NICs for migration traffic. Problem is that is typically the production network adapter and could only be 1 Gbs. Since I was using a dedicated NIC for iSCSI access, I decided to use dual NIC cards and use a dedicated 2.5Gb network segment for migration traffic, while the other NIC is dedicated to iSCSI traffic via a unique IPv4 subnet for each server connection to the QNAP server.
ProxMox documentation Migrate Configuration for Cluster
Migration configuration is located in /etc/pve/datacenter.cfg and has this syntax:
migration: [type=]<secure|insecure> [,network=<CIDR>]Migration traffic is encrypted using an SSH tunnel by default. On secure, completely private networks this can be disabled to increase performance.
migration: type=insecure,network=10.3.11.0/24Once the datacenter.cfg file has been updated, shortly (usually less than 30 seconds) ProxMox will start using the new network for migration traffic. Watching the migration progress dialog box we can see that transfer rates are routinely hitting 200MB/s and some peaks at 300MB/s. Bonus all that traffic does not compete with either Production network or iSCSI network traffic.
Next I’ll explore the HA Clustering capabilities of ProxMox.
